The Loqate Shopify Plus Integration Guide
The Loqate Shopify Plus Integration, downloadable via the Shopify App Store, allows you to quickly and easily add Loqate's Address Capture service to the checkout page of your Shopify Plus site. With this enabled you can provide your customers with type-ahead lookup functionality for address fields, reducing both input times and the likelihood of errors.
We've created this integration to take advantage of Shopify's new Checkout Extensibility functionality, which means you can leverage Shopify's latest technology as part of the Loqate app.
Installing and setting up this Shopify Plus app is a straightforward process, and in this guide we will take you through the handful of quick steps required to get up and running. You don't need any in-depth technical knowledge in order to install this app, just familiarity with Shopify Plus.
Prerequisites
Before you start installing and setting up the Loqate Shopify Plus Integration, you will need the following:
- A live Shopify Plus account
- A live Loqate account*
- A valid Loqate API key (see the API keys section below for more information on this)
*You can use the Loqate Shopify Plus app with both the Loqate Saas platform (available to North American customers) and Classic platform. If you're in the US and you're not sure which platform you're using, see our guide to the Loqate Saas Platform.
API keys
If you don't already have a Loqate API key, our Creating API Keys page has lots of information about how to set one up, and what to consider when you're doing that. For the Loqate Saas platform you can use any key; for the Classic platform we recommend you create a generic API key, but any key will work.
For information about how to ensure your Loqate integration is as secure as possible, see our API Security page.
Installation
There are a few quick steps to get the Loqate Shopify Plus Integration up and running:
- Install and configure the Loqate app (which you can find here)
- Add a checkout block
- Disable the native address lookup
Follow these steps in order, and you'll get up and running quickly and easily.
Installing and configuring the Loqate app
First, install the Loqate app from the Shopify App Store (see the Shopify app installation instructions for more details). Once that is done:
-
You should automatically be taken to the Admin section for your new Loqate app
-
If not, go to accounts.shopify.com, select the Your store option, then select the Loqate app on the left-hand side of the screen to open it
- Copy and paste your Loqate API key in to the API Key field on this screen:
![]()
Adding Loqate to your Shopify checkout experience
In order for your customers to use Loqate to find and verify their addresses at checkout, you need to customise your checkout page with the "Loqate-Checkout" block (See https://www.shopify.com/enterprise/blog/customize-shopify-checkout). Checkout blocks allow you to customise the look and functionality of your checkout layout and process.
- In the Admin section of your Shopify Plus account, go to
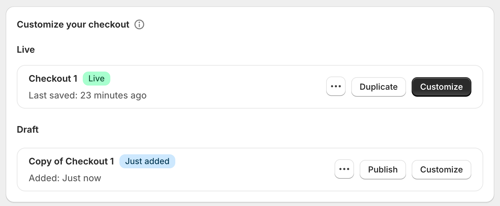
Settings > Checkout. From here you can either edit your existing checkout, or create a new draft of your checkout layout. - To edit your existing checkout click the Customize button, or to create a new draft checkout click the Duplicate button followed by Customize on the new version.
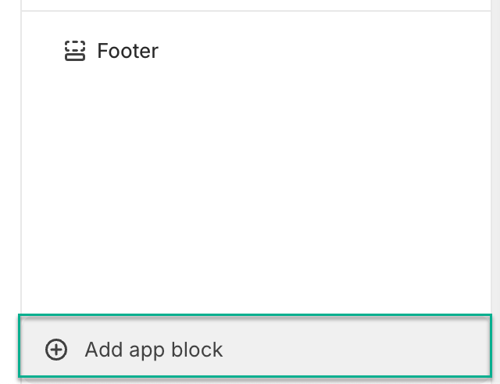
- Next, in the Sections menu of the checkout editor, scroll to the bottom of the page and click Add app block, then select the loqate-checkout app block.
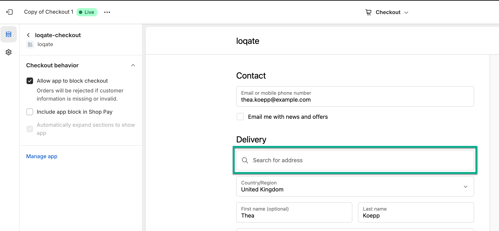
- The Loqate checkout extension will now be available on your checkout form - you should now be able to see the Search for address field on your form.
- Make sure you save the changes to your checkout, then exit the editor. If you created a new checkout draft, you can click the Publish button to make it live.
Disabling native address lookup
With that done, the last thing you need to do is disable Shopify's native address lookup, to replace it with Loqate's Address Validation service. To do this:
- Go to the site Settings page for your Shopify store
- Select the Checkout option from the left-hand menu
- Scroll to the Address collection preferences section
- Un-tick the Use address autocompletion option
- Click the Save button at the top-right of the screen to save this change
The Loqate Shopify app is now fully installed and ready to use.
Usage
Once the Loqate Shopify app is installed and configured, your customers can start using Loqate's Address Capture service when inputting their addresses. We've put together some screenshots of how that might look on an example checkout page, to give you a sense of what to expect.
Here's what the single search field looks like during an address lookup:

And here's how the address fields look after an address has been selected:

Troubleshooting
I can't see some of the Admin options described in this guide
The Loqate Shopify Integration requires a Shopify Plus account. If you don't use Shopify Plus, you won't see all of the necessary options and won't be able to use this integration.
The Capture autocomplete field is not showing on my checkout
Ensure that the API key is correct on the Admin page.
When selecting an address, the fields do not populate
Ensure that your API key is correct on the Admin page, and that you have sufficient credit on your Loqate account.