The Loqate Salesforce CRM Integration Guide
Download from the Salesforce AppExchange
The Loqate app, available from the Salesforce AppExchange, allows you to quickly and easily add Loqate address verification services to your instance of Salesforce CRM, providing type-ahead lookup functionality for address fields, and validation for both email addresses and phone numbers. With some or all of these services enabled, you can reduce the amount of time spent inputting customer details, and improve the accuracy of your database.
Available services
The Loqate app gives you access to these Loqate services in your Salesforce CRM instance:
- Address Capture, which provides a type-ahead solution for address input - referred to in Salesforce as Address finder
- Email Validation, which ensures the accuracy of customer email addresses - referred to in Salesforce as Email validator
- Phone Validation, which ensures the accuracy of customer phone numbers - referred to in Salesforce as Phone number validator
Use cases
There are two ways of using Loqate services in your Salesforce instance:
- On record pages, using Lightning components - all Loqate services
- During actions, using Flows (recommended) or Visualforce components (legacy, and not recommended) - Address Capture only
The Process section below will take you through how to set up both methods, beginning with overall installation before moving onto setting up mappings for use on record pages, then setting up Flows. For details of Visualforce setup, see the separate Legacy Visualforce elements section at the end of this article.
Prerequisites
Before installing the Loqate app you will need:
- A live Salesforce CRM account
- A live Loqate account
- A Loqate API key*
*Note that your API key is designed to be an open access key to your account - there are security controls within your Loqate account to ensure this is not abused. The key used in the app will be your primary mechanism of reporting for usage, so we recommend create a new key rather than reusing one you may already have on a website or other application.
Process
There are a few quick steps to get the Loqate app up and running:
- Install the app
- Assign permissions
- Add your Loqate API key
- Set up address mappings
- Add Loqate widgets to your object pages
- Optional: Address finder settings
- Add address Capture to Flows
If you only want to use the Email validator and Phone validator controls, you can skip the address mapping step. If you want to also use the Address finder control though, please follow all of the steps below.
Installing the Loqate app
We recommend installing the Loqate app directly from the Salesforce AppExchange - adding the app from here will ensure you're always installing the latest version.
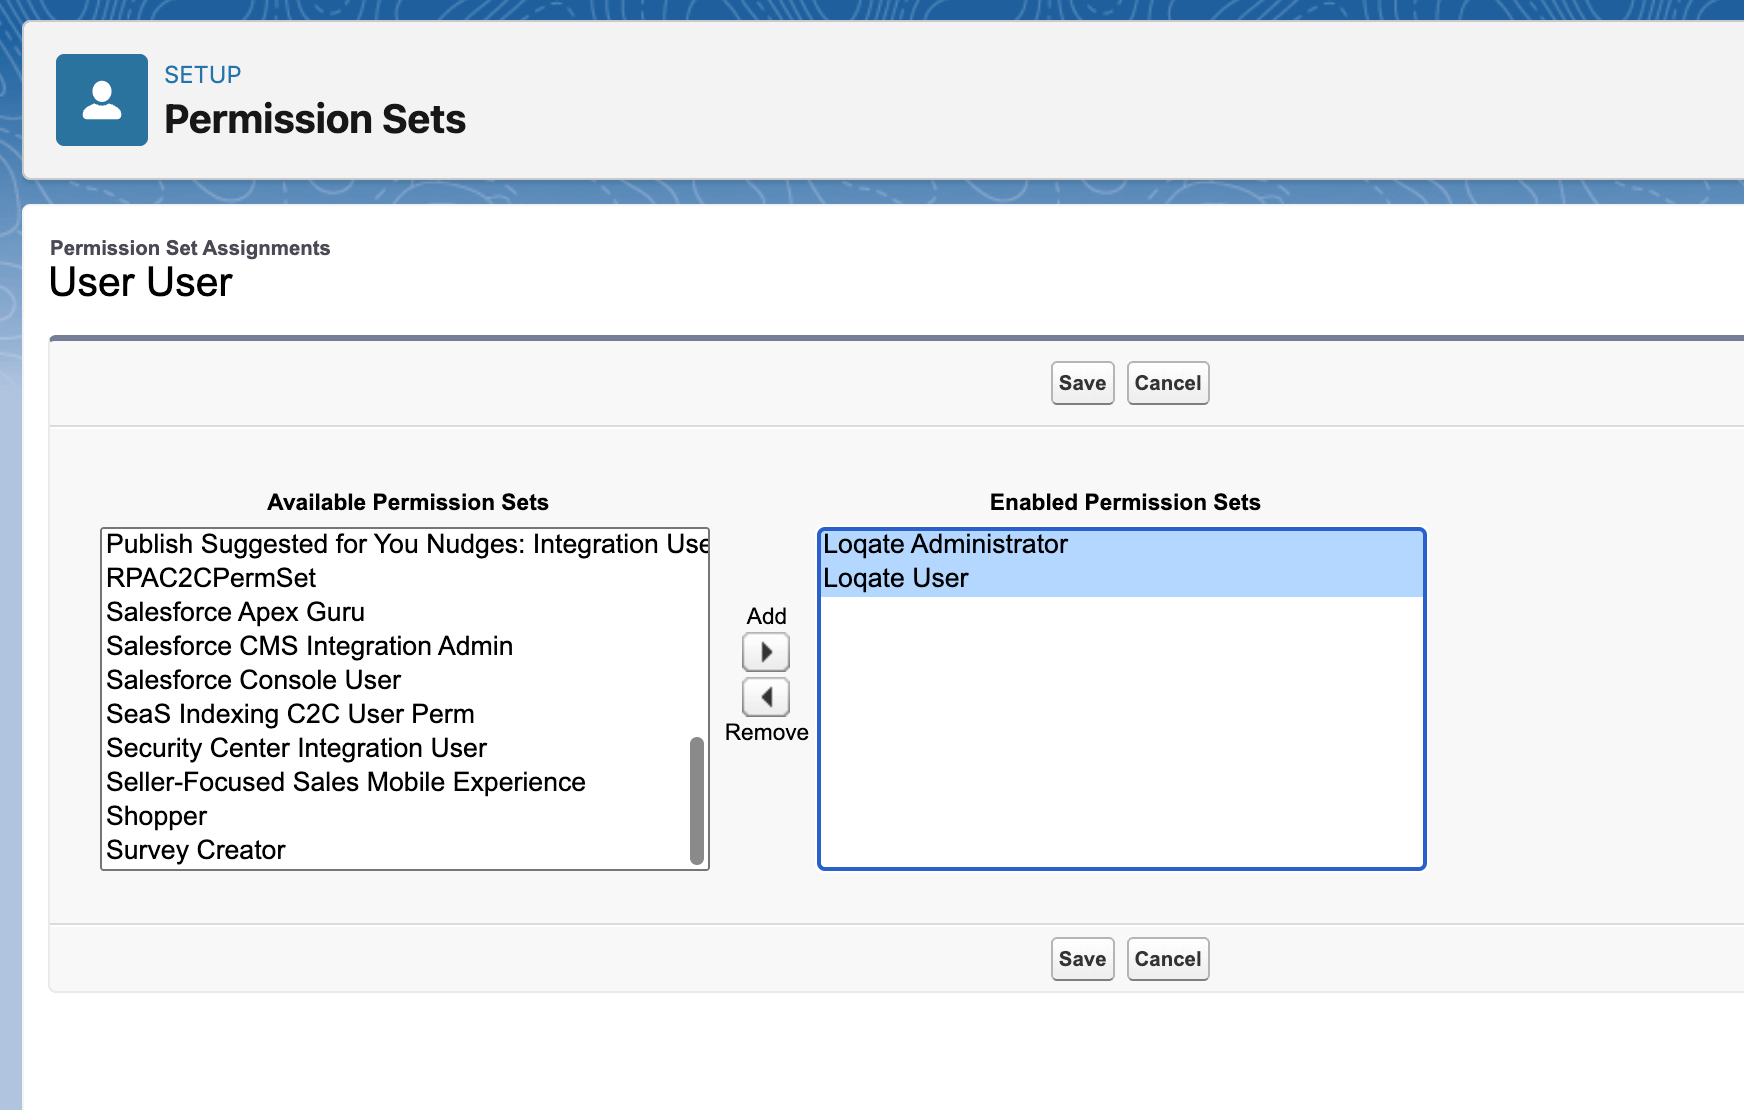
Setting permissions
The Loqate app includes two permission sets: Loqate Administrator and Loqate User. The use cases for these sets are as follows:
- Loqate User: for any users who need to use the Loqate controls on the page to validate addresses, email addresses and/or phone numbers, but don’t need to administer the settings of the app itself
- Loqate Administrator: for users who need to administer settings and mappings for the app, as well as use the controls as per the Loqate User permission set
Set the permissions as required for each of your users under Setup > Permission Sets, then move on to the next step.
App setup
With the app installed and permission sets assigned, the next step is to add your Loqate API key to the app, which you can do in the API Settings section of the Loqate Settings page.
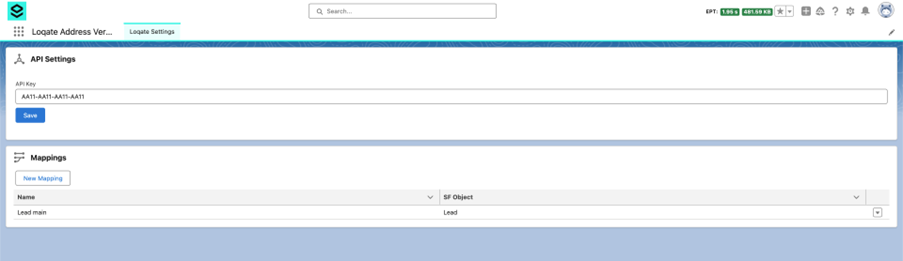
Note: accessing the Settings page requires the Loqate Administrator permission set.
Select the Loqate app from the App Launcher, then copy and paste your API key into the API Settings section and click Save. With that done, the Email validator and Phone validator controls are both enabled and can be added to pages - if you only want to use those two controls, you can skip ahead to the Loqate widgets section. To add the Address finder control as well, follow the steps below for creating address mappings.
Address mappings
For each address type that you want to populate using the Address finder control, you need to create an address mapping. This may involve creating multiple mappings for a single object - for example, for the Contact object you might create one mapping for the 'Mailing' address and another for the 'Other' address.
You can create address mappings in the Settings page of the Loqate app.
- In the Mappings section, click New Mapping
- Name your mapping (we recommend using a distinct and memorable name, to distinguish it from other address types - for example, "Contact Mailing")
- From the 'Select an object' drop-down, choose the object that you want to create a mapping for

- Click the + Add Field button, then from the 'Select a field' drop-down choose a field that you want to populate with address data
- From the 'Select a element' drop-down, choose a Loqate element to map to your chosen field

- Click the Add Field Mapping button to save and add your new mapping to the list
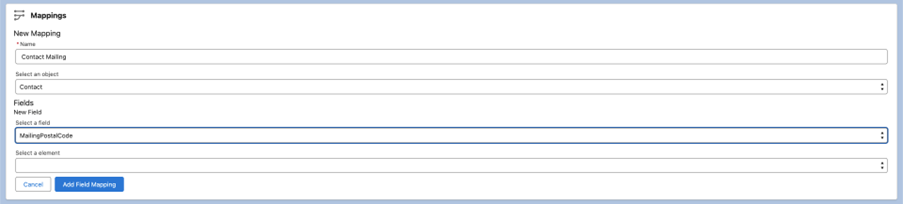
You can create as many mappings as you need by just repeating these steps.
Custom mappings
If required, you can also use custom address mappings.
- When selecting an element to map to a field, choose the custom format option option from the drop-down list
- In the 'Custom pattern' field that appears, enter your custom field mapping
- For example, entering "{line1},{ line2} will concatenate line1 and line2, separated by a comma and a space (assuming line2 is available - if not, only line1 will be included)
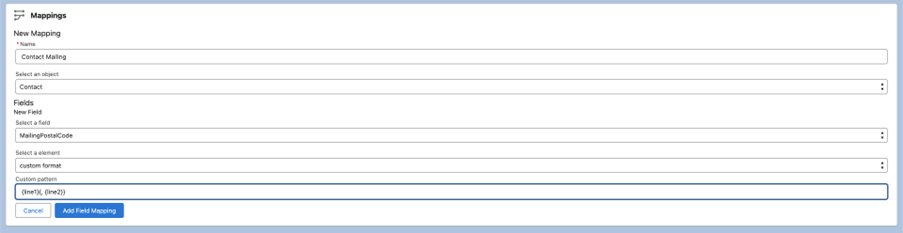
- See the Formatting section of our Advanced Setup Guide for more information about custom field values
Loqate widgets
In order to start using Loqate functionality, you need to add each control (i.e. Address finder, Email validator and Phone validator, where appropriate) to your object pages.
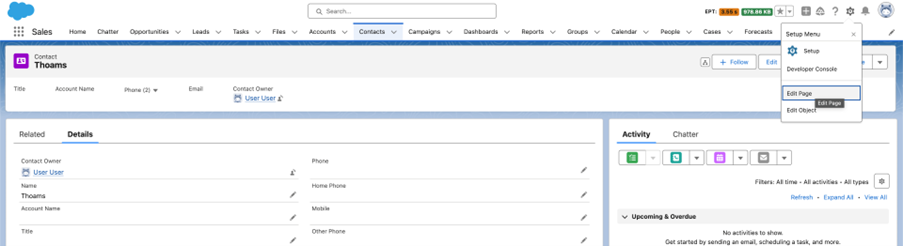
- From the Details tab on the Contacts page, select Settings and then Edit Page
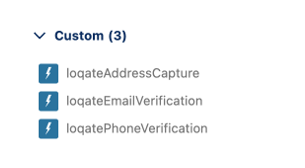
- In the Lightning App Builder, look for the Loqate controls in the Custom section of the Components menu. You should see loqateAddressCapture, loqateEmailVerification and loqatePhoneVerification:
- You can drag each of these onto your page, placing them where you want them. Here's an example showing all three components added to the right-hand side of the page:
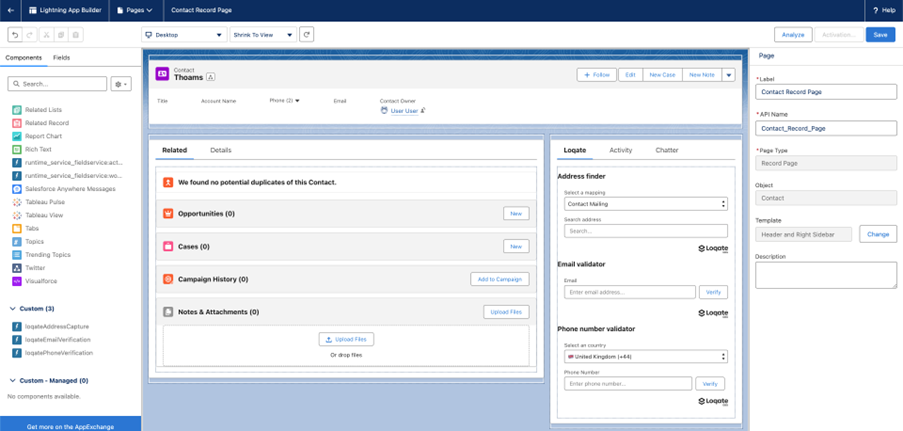
- Once you've placed all of the components, Save and Activate the page to be able to start using them
- Repeat this process for all pages that you want to add the Loqate features to
Optional: Address finder settings
The Address finder control includes some additional settings which you can amend if required. To see these settings, select an Address finder control where it's been added to one of your pages.
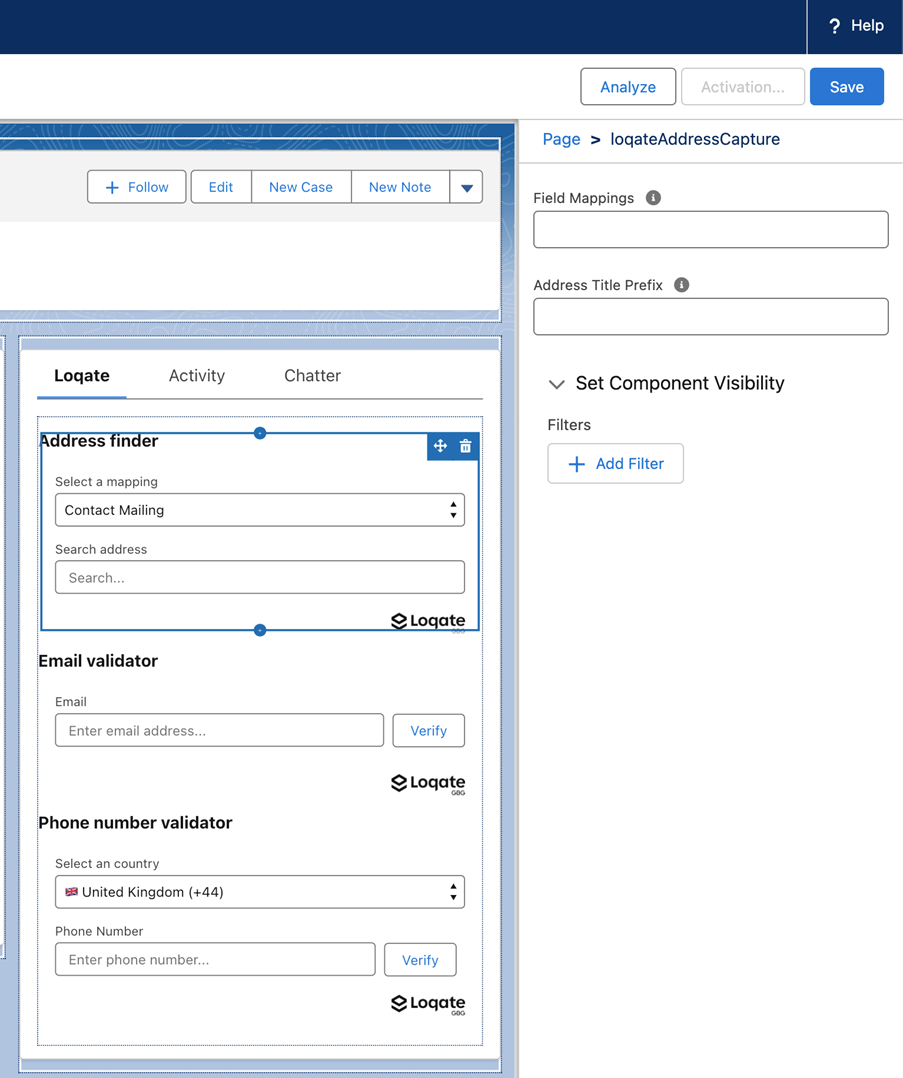
You'll need to amend the settings for each instance of the control.
Field mappings
By default, the Address finder control will display a select box listing all of the mappings you've created for the object on which the control has been placed. You can then select the relevant mapping you want to use.
Optionally though, you can lock the Address finder control to a particular mapping by entering a specific mapping name in the Field Mappings box. The control will no longer display the 'Select a mapping' box, and will instead always use the mapping you've chosen.
Address title prefix
If you have multiple Address finder controls on a single page (for example if you've locked one or more of them to particular mappings), it's useful to give each one a specific name to clearly differentiate them. You can use this setting to add additional text to the start of each control's title.
Whatever text you enter in the Address Title Prefix box will be added at the start of its title - so for example if you have both 'mailing' and 'other' address fields on a page, add "Mailing" into this box for one of the controls so that it will display as "Mailing Address finder".
Add Address Capture to Flows
Follow these steps to add Address Capture to a Flow:
- Open the Flow editor for the Flow you want to add Address Capture to. For this example we’ll use Create a case
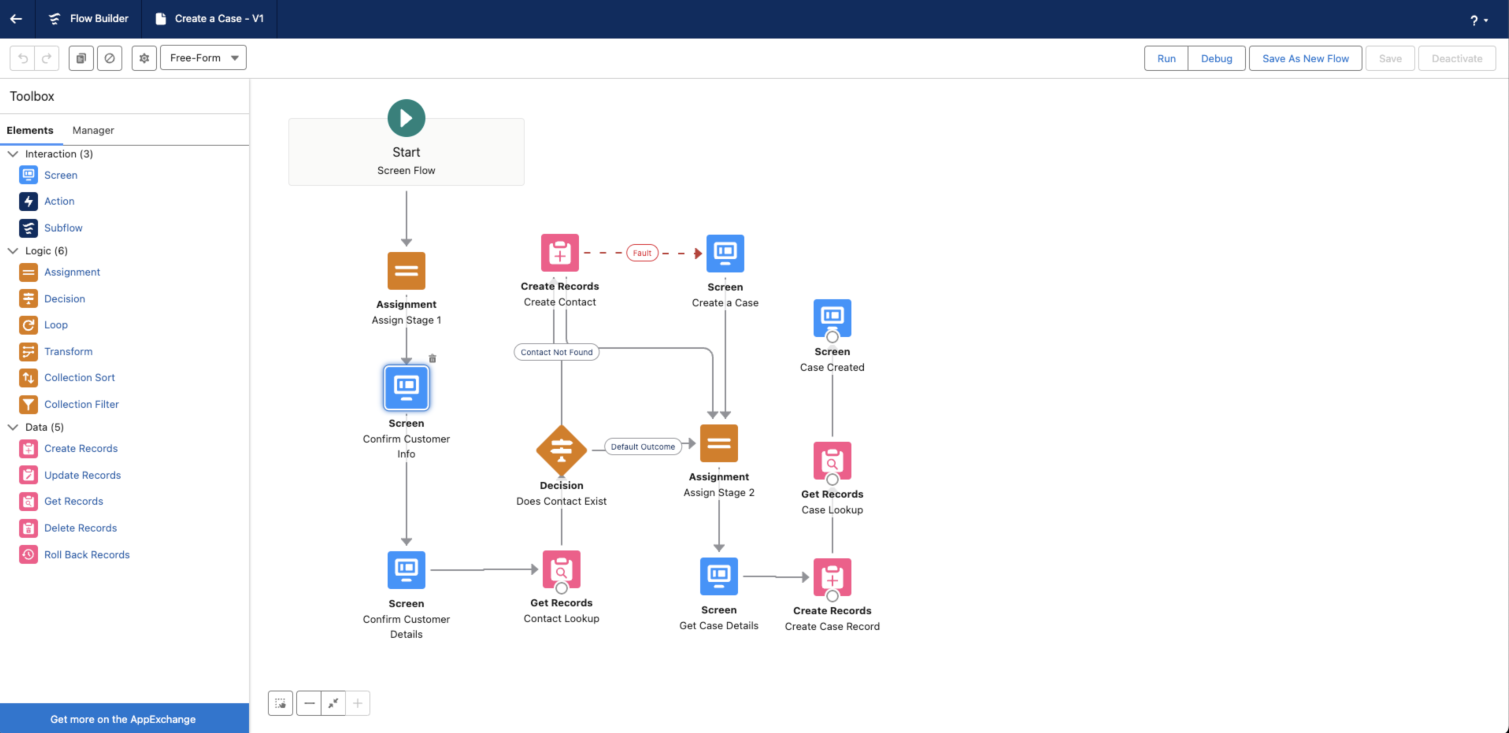
- From here, choose a screen to add the Loqate control to, and open the screen editor. In this example we'll use the Confirm Customer Info screen
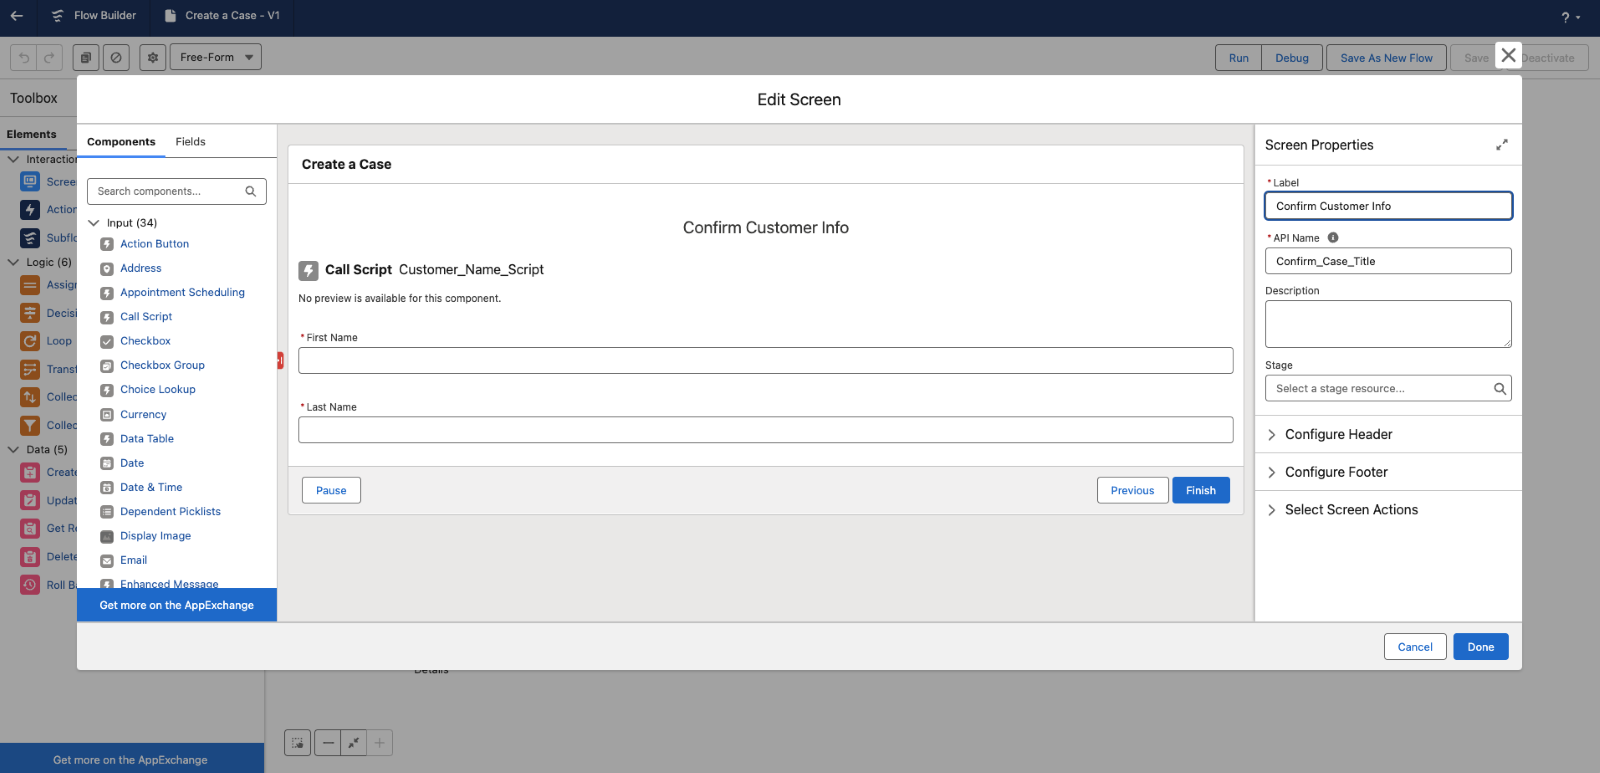
- The Loqate Address Capture component will be listed under Custom, so scroll down to that and drag the component onto your view
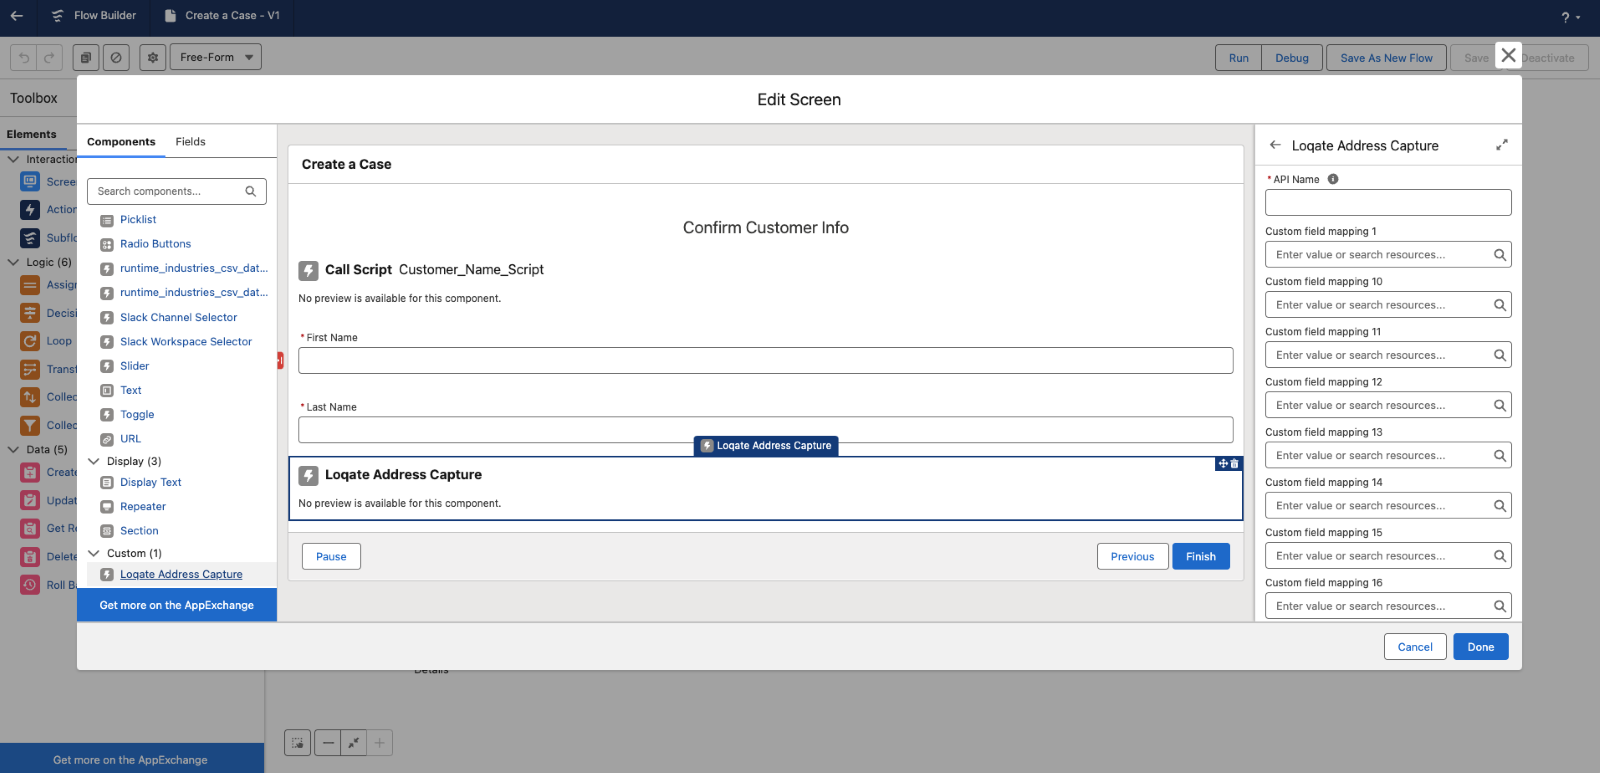
- Make sure you add a name into the API Name field
- You shouldn't need to fill in any of the other fields, as they're in place to allow for the Flows data model
- Click Done, then run or debug the Flow to view the control and output

- From here you can see that the Search for an address field is present
- Having searched for and found an address, click Next to move to the next screen - in this case the Confirm Customer Details screen
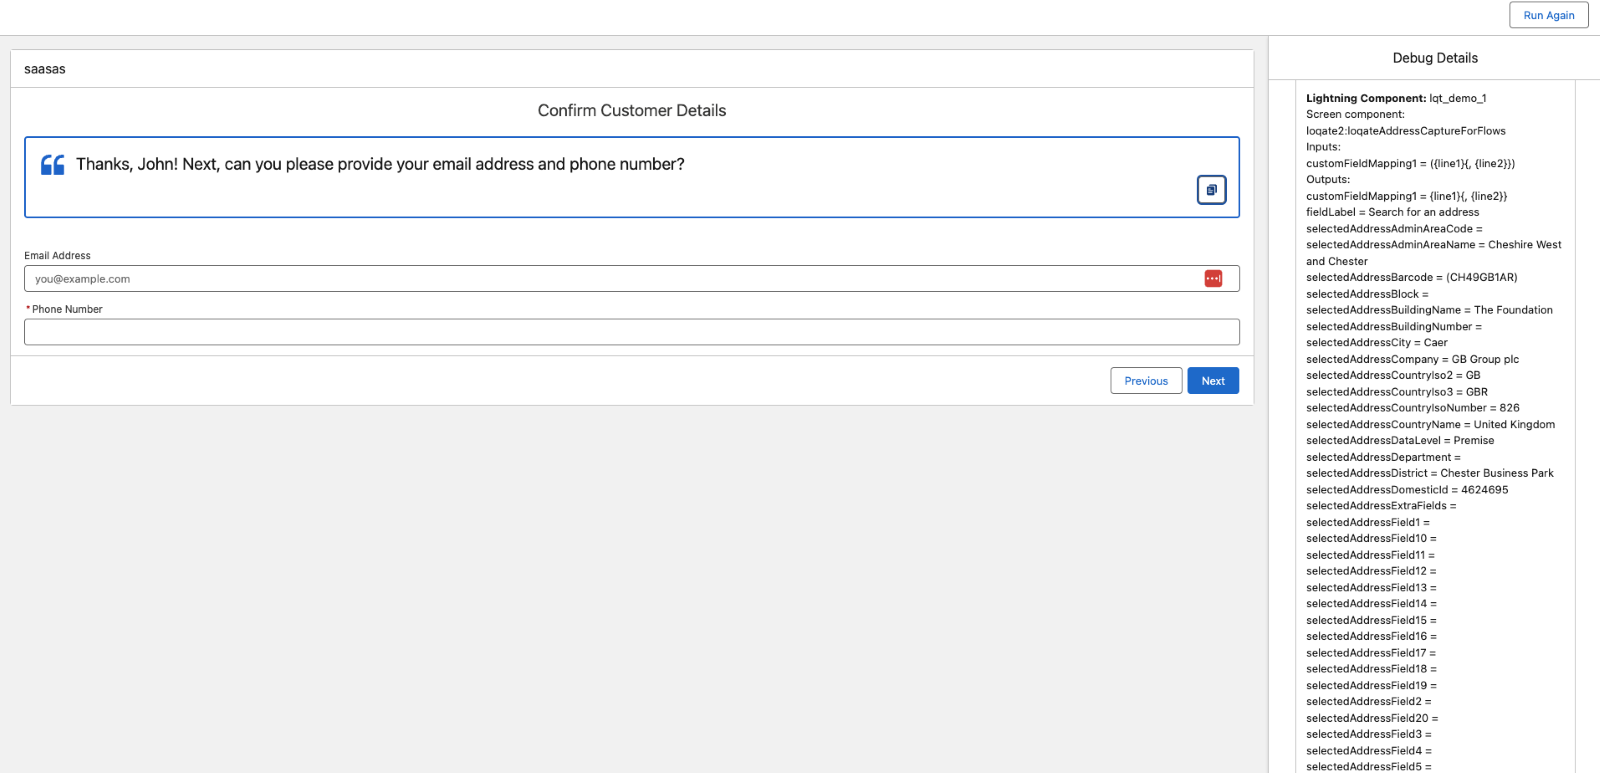
- Here you can see the returned address data, which you can then use in the rest of the Flow
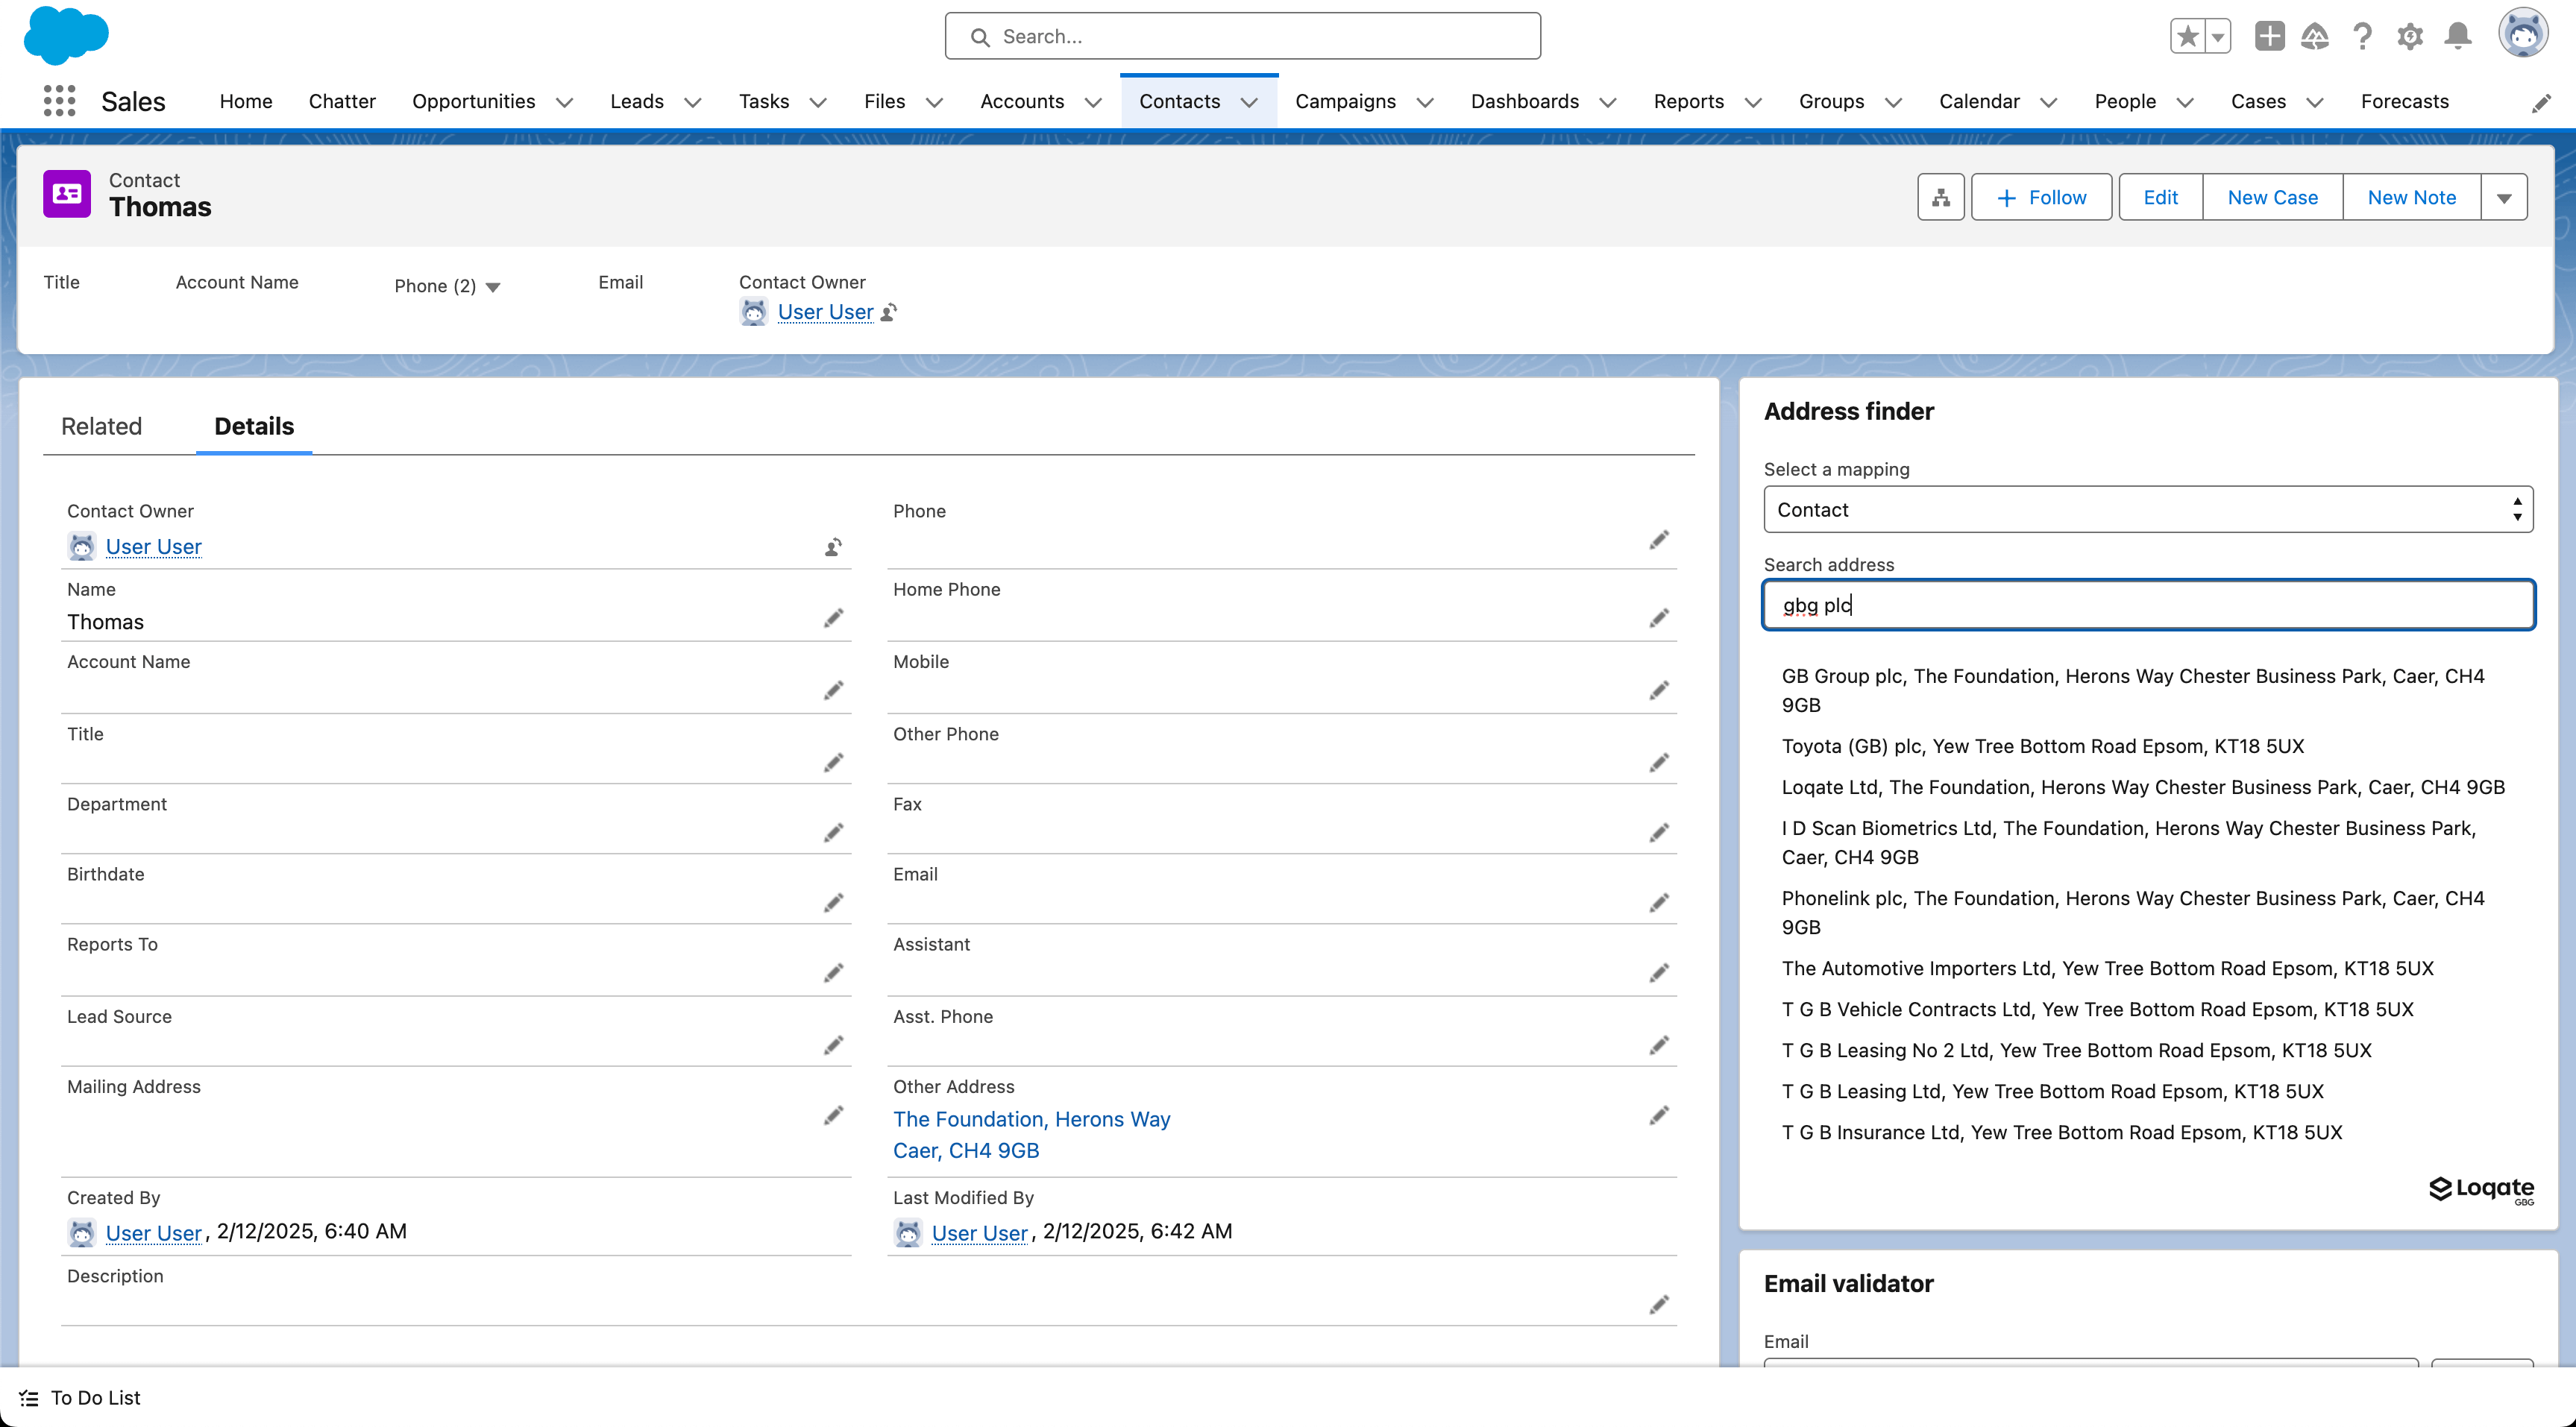
In use
With the Loqate app installed and configured, you can start using the Address finder, Email validator and Phone number validator controls when inputting addresses, email addresses and phone numbers into Salesforce.
For example, here's how the Address finder control looks during an address search:
Legacy Visualforce elements
In some cases you may want to use a more legacy approach to including Address Capture in your Salesforce instance, for example by overriding the New button action on a record listing page.
In the following examples we’ll use the standard Contact record type to demonstrate the use of the included legacy Visualforce component.
The Loqate app ships with a Visualforce page that can be used to replace the New button action via Object Manager, and is a reference build for the outcome of this example.
Building the page
In this example we will be creating a new page to replace the standard Contact Create page and allow for Address Capture to be used in that process. Please note that this is a legacy approach, and we would recommend you use Flow views for this kind of action.
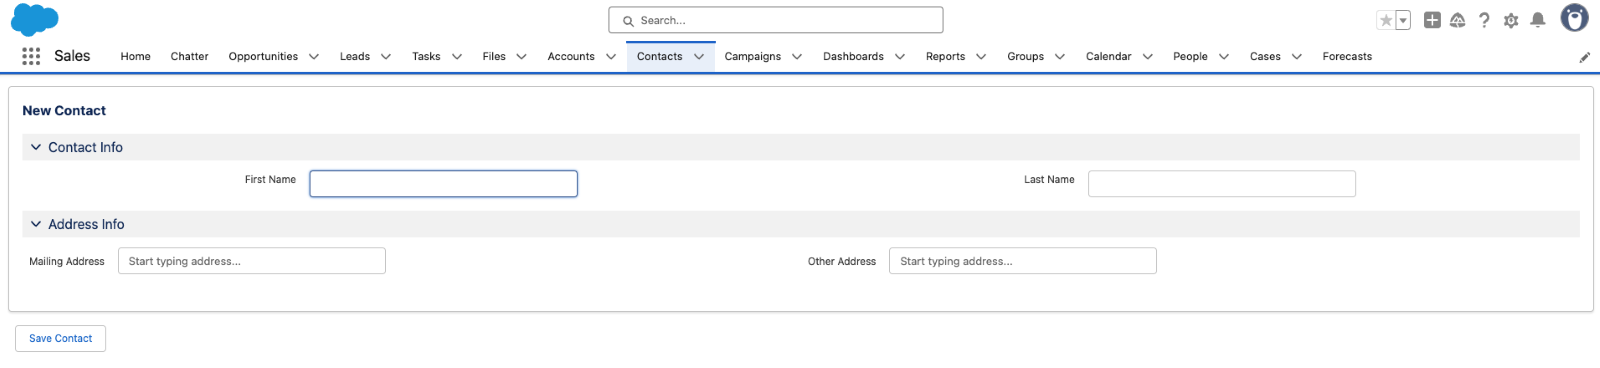
Each of the address controls in the above screenshot are an example of the legacyLoqateAddressCapture Visualforce component. The full Visualforce page looks like this:
<apex:page lightningStylesheets="true" standardController="Contact">
    <apex:form id="form">
        <apex:pageBlock title="New Contact">
            <apex:pageBlockSection title="Contact Info" columns="2">
                <apex:inputText value="{!Contact.FirstName}" label="First Name"/>
                <apex:inputText value="{!Contact.LastName}" label="Last Name"/>
            </apex:pageBlockSection>
            <apex:pageBlockSection title="Address Info" columns="2">
                <loqate2:legacyLoqateAddressCapture label="Mailing Address" onAddressSelectedFunction="handleMailingAddressSelected" mapping="Contact Mailing" />
                <loqate2:legacyLoqateAddressCapture label="Other Address" namespace="other" onAddressSelectedFunction="handleOtherAddressSelected" mapping="sdfghjk" />
            </apex:pageBlockSection>
        </apex:pageBlock>
    <!-- Hidden address fields -->
        <apex:inputHidden value="{!Contact.MailingStreet}" id="street"/>
        <apex:inputHidden value="{!Contact.MailingCity}" id="city"/>
        <apex:inputHidden value="{!Contact.MailingState}" id="state"/>
        <apex:inputHidden value="{!Contact.MailingPostalCode}" id="postal"/>
        <apex:inputHidden value="{!Contact.MailingCountry}" id="country"/>

        <apex:inputHidden value="{!Contact.OtherStreet}" id="otherStreet"/>
        <apex:inputHidden value="{!Contact.OtherCity}" id="otherCity"/>
        <apex:inputHidden value="{!Contact.OtherState}" id="otherState"/>
        <apex:inputHidden value="{!Contact.OtherPostalCode}" id="otherPostal"/>
        <apex:inputHidden value="{!Contact.OtherCountry}" id="otherCountry"/>

        <apex:commandButton action="{!save}" value="Save Contact"/>
        <script>
            function handleMailingAddressSelected(address, fields) {
                console.log('Address selected:', address, fields);
                document.getElementById('{!$Component.street}').value = address.street;
                document.getElementById('{!$Component.city}').value = address.city;
                document.getElementById('{!$Component.state}').value = address.province;
                document.getElementById('{!$Component.postal}').value = address.postalCode;
                document.getElementById('{!$Component.country}').value = address.countryName;
                // You can add additional logic here to handle the address selection
            }
            function handleOtherAddressSelected(address, fields) {
                console.log('Other Address selected:', address, fields);
                document.getElementById('{!$Component.otherStreet}').value = address.street;
                document.getElementById('{!$Component.otherCity}').value = address.city;
                document.getElementById('{!$Component.otherState}').value = address.province;
                document.getElementById('{!$Component.otherPostal}').value = address.postalCode;
                document.getElementById('{!$Component.otherCountry}').value = address.countryName;
                // You can add additional logic here to handle the address selection
            }
        </script>
</apex:form>

</apex:page>
As you can see the controls are included like this:
<loqate2:legacyLoqateAddressCapture label="Mailing Address" onAddressSelectedFunction="handleMailingAddressSelected" mapping="Contact Mailing" />
                <loqate2:legacyLoqateAddressCapture label="Other Address" namespace="other" onAddressSelectedFunction="handleOtherAddressSelected" mapping="sdfghjk" />
You may need one, or as in this case multiple instances of the control for your page.
The attributes for this component are as follows:
| Attribute name | Description | Example |
|---|---|---|
| label | This is the label for the control, and will appear alongside the control input box on pages. | Mailing Address |
| namespace | Optional. This attribute is important when you have multiple controls on a single page, as this allows the controls to operate independently of each other. It must be unique across rendered controls. | mailing |
| onAddressSelectedFunction | This should be set to the name of the callback function that selected addresses will be returned to. | handleMailingAddressSelected |
| Mapping | Optional. If a mapping group name is provided, the second argument passed to the callback function will be an object whose keys and values are those of the mapped fields. | Contact Mailing |
Let's look in more detail at some of the aspects of the callback function and how the data gets into a record.
The page itself (as well as using Lightning stylesheets to give a Lightning look and feel) uses the standard Contact controller:
<apex:page lightningStylesheets="true" standardController="Contact">This allows it to act as a creation form for the standard Contact object. This in turn means that you can set values against the Contact records properties within the page. For the first and last name fields, this is achieved by binding the field to the FirstName and LastName fields of the controller:
<apex:inputText value="{!Contact.FirstName}" label="First Name"/>
                <apex:inputText value="{!Contact.LastName}" label="Last Name"/>
However, for the address lookups controls this is a little more involved. You can’t map directly from JS to the values, so instead you expose the properties you want to set via a selection of hidden inputs:
<apex:inputHidden value="{!Contact.MailingStreet}" id="street"/>
        <apex:inputHidden value="{!Contact.MailingCity}" id="city"/>
        <apex:inputHidden value="{!Contact.MailingState}" id="state"/>
        <apex:inputHidden value="{!Contact.MailingPostalCode}" id="postal"/>
        <apex:inputHidden value="{!Contact.MailingCountry}" id="country"/>

        <apex:inputHidden value="{!Contact.OtherStreet}" id="otherStreet"/>
        <apex:inputHidden value="{!Contact.OtherCity}" id="otherCity"/>
        <apex:inputHidden value="{!Contact.OtherState}" id="otherState"/>
        <apex:inputHidden value="{!Contact.OtherPostalCode}" id="otherPostal"/>
        <apex:inputHidden value="{!Contact.OtherCountry}" id="otherCountry"/>
You can then declare a callback function for each of the address lookups on the page. These fill take the address output of the lookup, and push it into the record fields defined above:
<script>
            function handleMailingAddressSelected(address, fields) {
                console.log('Address selected:', address, fields);
                document.getElementById('{!$Component.street}').value = address.street;
                document.getElementById('{!$Component.city}').value = address.city;
                document.getElementById('{!$Component.state}').value = address.province;
                document.getElementById('{!$Component.postal}').value = address.postalCode;
                document.getElementById('{!$Component.country}').value = address.countryName;
                // You can add additional logic here to handle the address selection
            }
            function handleOtherAddressSelected(address, fields) {
                console.log('Other Address selected:', address, fields);
                document.getElementById('{!$Component.otherStreet}').value = address.street;
                document.getElementById('{!$Component.otherCity}').value = address.city;
                document.getElementById('{!$Component.otherState}').value = address.province;
                document.getElementById('{!$Component.otherPostal}').value = address.postalCode;
                document.getElementById('{!$Component.otherCountry}').value = address.countryName;
                // You can add additional logic here to handle the address selection
            }
        </script>
Finally, you can add a command button that will call the Save function on the standard controller:
<apex:commandButton action="{!save}" value="Save Contact"/>The response to this button press off a standard controller is to redirect to the record, so that flow is taken care of.
Using the page in place of the standard New view
With a Visualforce page in place that uses the Address Capture components, you now need to override the default behaviour of the New button on the contact listing page.
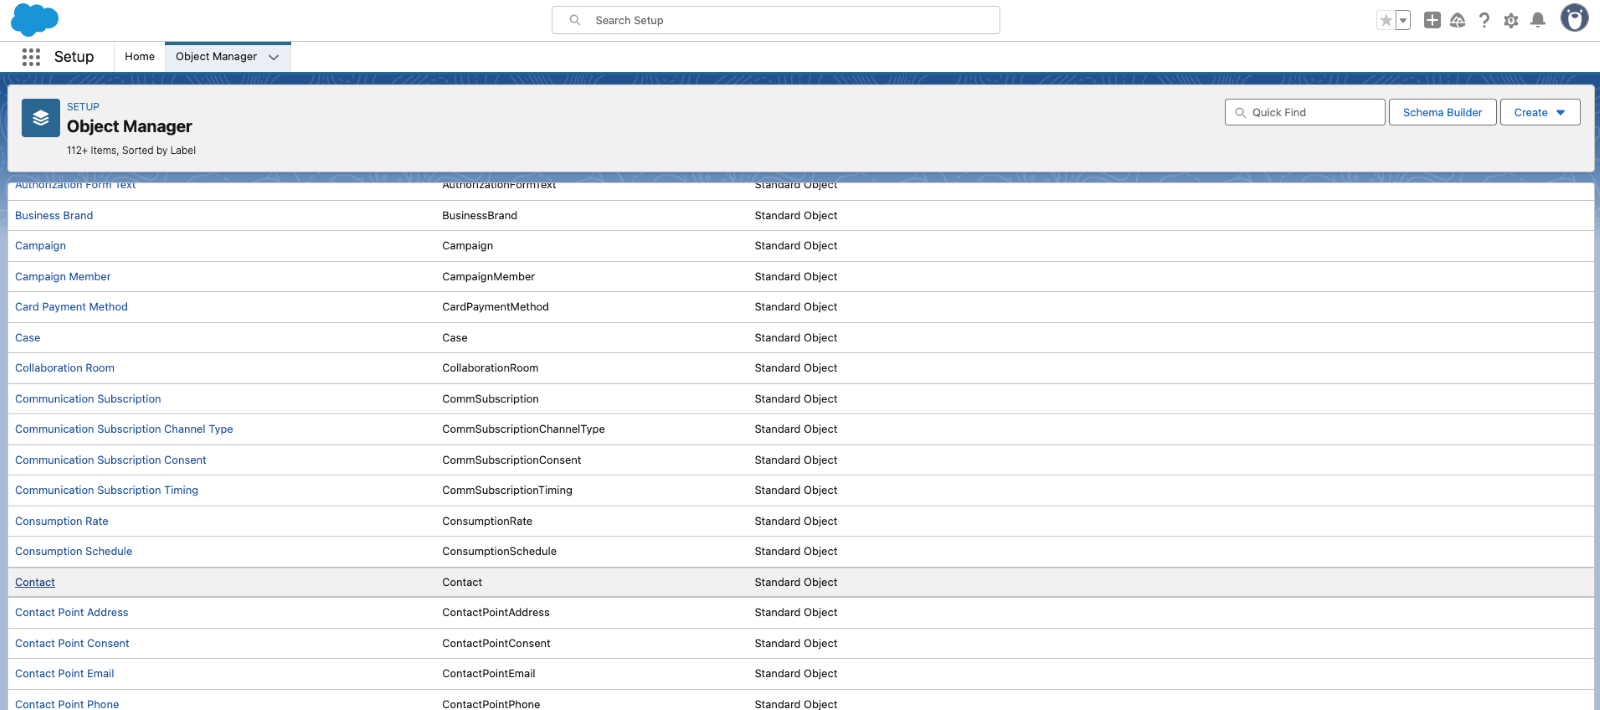
This is achieved through the Object Manager, so navigate to Setup and search for Object Manager. Once there, select Contact from the list.
Next select Button, Links and Actions from the left-hand menu, then edit the New action – you should be able to select the new page from the Visualforce page dropdown field:
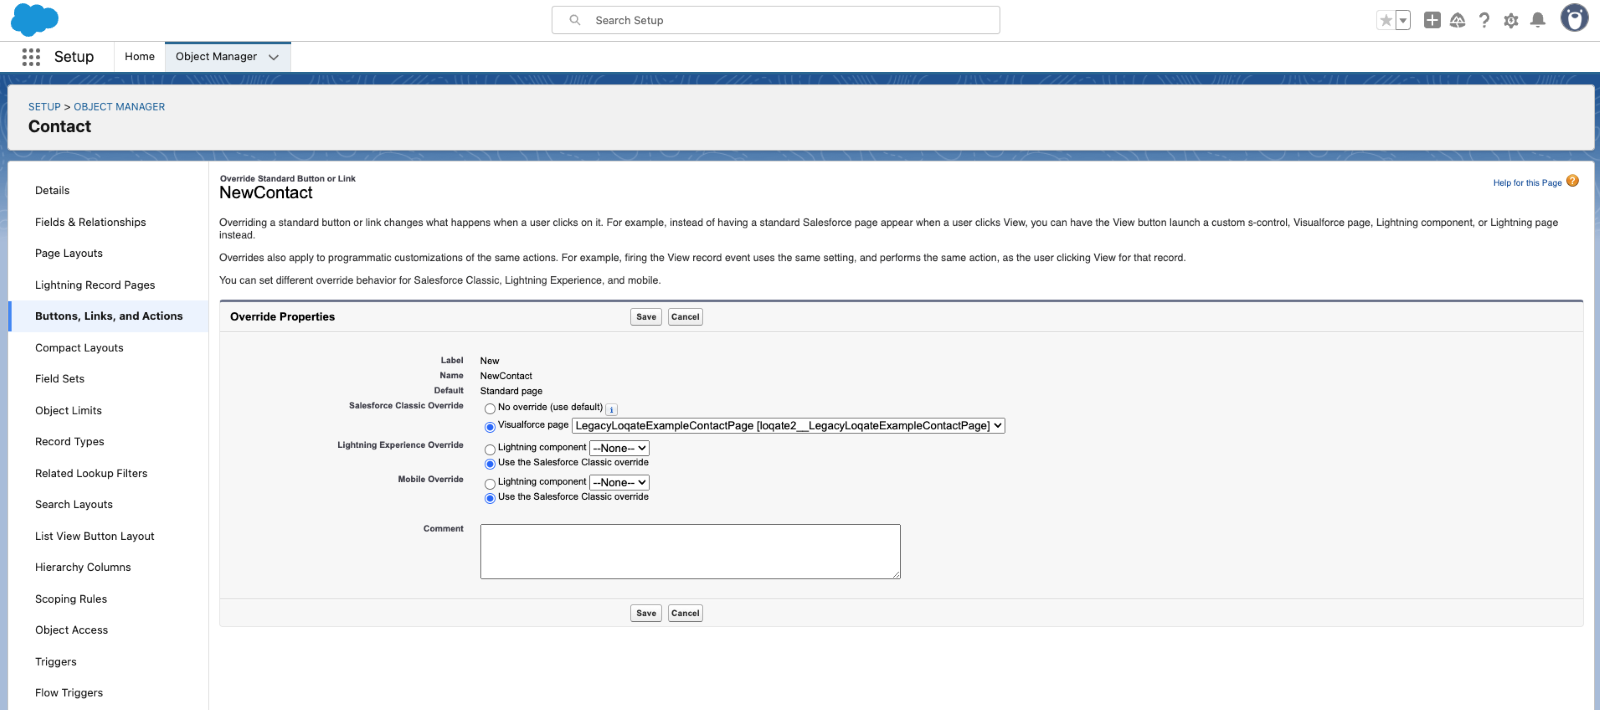
Click Save, and from now on the New action on the contact listing page will open your new page, and you can create contacts with verified addresses.
