The Loqate Shopify Plus Integration Guide
Download from the Shopify App Store
The Loqate Shopify Plus Integration, downloadable via the Shopify App Store, allows you to quickly and easily add Loqate's address validation services to the checkout page of your Shopify Plus site. With some or all of these services enabled you can provide your customers with type-ahead lookup functionality for address fields (reducing both input times and the likelihood of errors), verification for manually-entered addresses, and email address validation.
We've created this integration to take advantage of Shopify's new Checkout Extensibility functionality, which means you can leverage Shopify's latest technology as part of the Loqate app.
Installing and setting up this Shopify Plus app is a straightforward process, and in this guide we will take you through the handful of quick steps required to get up and running. You don't need any in-depth technical knowledge in order to install this app, just familiarity with Shopify Plus.
Available services: Address Capture, Address Verify and Email Validation
The Loqate Shopify Plus Integration includes three Loqate services:
- Address Capture, which provides a type-ahead solution for address input
- Address Verify, which ensures the accuracy of manually-entered addresses
- Email Validation, which ensures the accuracy of customer email addresses
Read on to find out more about what each service does, and how they complement each other.
NOTE: these services are designed to work together, but each one can be enabled/disabled individually. Address Capture is enabled by default, but while it's not recommended it is possible to disable Address Capture and use just Address Verify and/or Email Validation. See the 'Use without Address Capture' section below for more details.
Address Capture
This is active by default once you've installed and configured the app, adding type-ahead address lookup functionality to the Address field on your checkout form and allowing customers to start typing in their address and then select the relevant one from a list of suggested addresses.
Address Capture is available in both the Delivery address and Billing address sections.
Address Verify
If enabled, Address Verify adds an extra layer of verification by checking addresses against our reference data using a process of correction, standardisation, formatting, enhancement and verification. If appropriate, it can then offer an alternative which the customer can either agree to use, or dismiss in favour of their original entry.
Address Verify is available on the Thank You page, post-checkout, and can make changes to customers' delivery addresses (it doesn't affect the billing address).
NOTE: Address Verify can also be added to the Delivery address section of the checkout page, but this option is now deprecated and will be removed in time. We strongly recommend that you don't use Address Verify to the checkout page, and only use the post-checkout option, as this allows you to use Address Verify alongside functions such as wallets (for Apple/Google Pay) and logged-in users. If you already have Address Verify enabled for the checkout page, we recommend you disable this and enable the post-checkout option instead.
Email Validation
This is an optional feature which, if enabled, allows you to validate customer email addresses as they're being entered. If a customer enters an invalid email address*, they will be notified that the email address can't be validated and won't be able to proceed through the checkout form until they enter a valid email address.
Otherwise, customers who enter valid email addresses will not have their experience interrupted or visually altered in any way.
*See the 'Response fields' section of the Email Validation API documentation for details of why an email address might be invalid.
Prerequisites
Before you start installing and setting up the Loqate Shopify Plus Integration, you will need the following:
- A live Shopify Plus account
- A live Loqate account
- A new Loqate API key (see the API keys section below for more information on this)
Loqate accounts
You can use the Loqate Shopify Plus app with both the Loqate Saas platform (available to North American customers) and Classic platform. If you're in the US and you're not sure which platform you're using, see our guide to the Loqate Saas Platform.
It's important to note, however, that Address Verify functionality is only available via the Classic platform. You can use both Address Capture and Address Verify with a single Classic platform API key.
API keys
You'll need a new Loqate API key, dedicated to this service (our Creating API Keys page has lots of information about how to set one up, and what to consider when you're doing that). For the Loqate Saas platform you can use any key; for the Classic platform we recommend you create a generic API key, but any key will work.
For information about how to ensure your Loqate integration is as secure as possible, see our API Security page.
Installation
There are a few quick steps to get the Loqate Shopify Plus Integration up and running:
- Install and configure the Loqate app (which you can find here)
- Recommended: include company name
As well as those key actions, there are also some additional steps that you can follow if required:
- Use without Address Capture (not recommended)
- Advanced Settings
Follow these steps in order, and you'll get up and running quickly and easily. If you need help you can contact support@loqate.com.
Installing and configuring the Loqate app
The initial setup will add the Loqate app to your Shopify store, at which point Address Capture will be enabled by default. You can then also enable Address Verify and/or Email Validation.
Basic setup
First, install the Loqate app from the Shopify App Store (see the Shopify app installation instructions for more details). Once that is done:
-
You should automatically be taken to the Admin section for your new Loqate app
-
If not, go to accounts.shopify.com, select the Your store option, then select the Loqate app on the left-hand side of the screen to open it
- Copy and paste your Loqate API key in to the API Key field on this screen, then click the Save button:

With that done, you can add one or more of the Loqate services to your store using the steps below.
Address Capture
With the app installed, Address Capture is automatically available. There is, however, an additional step to make sure Address Capture is added to your checkout. Here are the steps to follow:
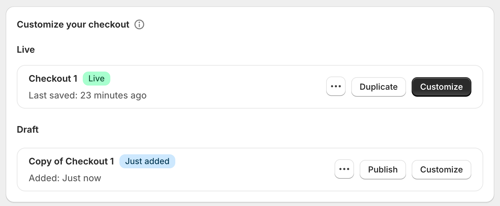
- In the Admin section of your Shopify Plus account, go to
Settings > Checkout. From here you can either edit your existing checkout, or create a new draft of your checkout layout - To edit your existing checkout click the Customize button, or to create a new draft checkout click the Duplicate button followed by Customize on the new version
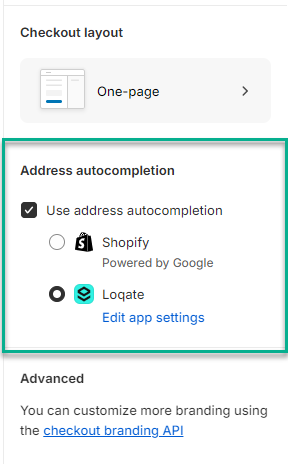
- Once you're editing your checkout, go to the Settings menu (the cog icon on the left-hand side), scroll down to the Address autocompletion section and select the Loqate option to set Loqate as your provider:
- Make sure you save the changes to your checkout, then exit the editor. If you created a new checkout draft, you can click the Publish button to make it live
Address Capture will now be available on your checkout. If you also want to enable Address Verify and/or Email Validation, carry on through the next sections.
Address Verify
There are a few steps required to enable Address Verify functionality to your checkout:
First, you need to add the Loqate-Checkout app block to your store (see https://www.shopify.com/enterprise/blog/customize-shopify-checkout). App blocks allow you to customise the look and functionality of your checkout layout and process, and this block is required in order to use Address Verify on the Thank You page. Here's how to add this block:
- In the Admin section of your Shopify Plus account, go to
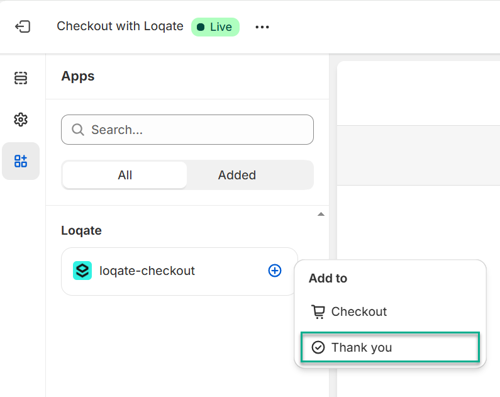
Settings > Checkout. From here you can either edit your existing checkout, or create a new draft of your checkout layout (see the Address Capture section above for more details) - Next, select the Apps icon (the bottom icon) in the left-hand menu of the checkout editor, then search for 'Loqate'
- Select the loqate-checkout app, then click the plus button and select Thank you from the drop-down list - this adds the app block to the Thank You page
- With that done, make sure you save the changes to your checkout, then exit the editor. If you created a new checkout draft, you can click the Publish button to make it live.
The next step is to disable the default address verification by Shopify. If this is left enabled, additional suggestions may be displayed against individual address fields, which can cause confusion for customers.
- Still in Settings > Checkout, scroll down to the Address collection preferences section:
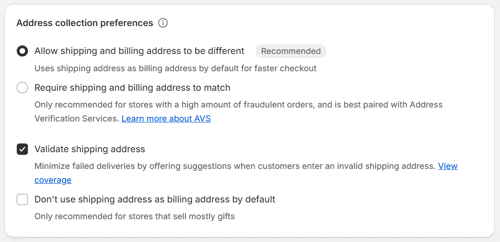
- Make sure the Validate shipping address option is unticked, then click the Save button
The final step is to enable Address Verify in the Loqate app's Admin page.
NOTE: Address Verify is only available if you're using a Classic platform API key. If you're using a Saas platform API key, the Address Verify section below the API key section will remain greyed out.
If you're using a Classic platform API key, once you've entered your key into the API Key field in the Loqate app's Admin page, the Address Verify section below will become editable:

- Scroll down to the Address Verify section and select the Enable address verification for post checkout option
- NOTE: to use the post checkout option, please ensure your store is not password protected
- If you also want to enable Address Verify on the checkout page you can select the Enable address verification for checkout option too - this is not recommended, however, and this option will be removed soon
- Click the Save button, and Address Verify will now be available.
Email Validation
The steps to enable Email Validation in your checkout are similar to those for Address Verify.
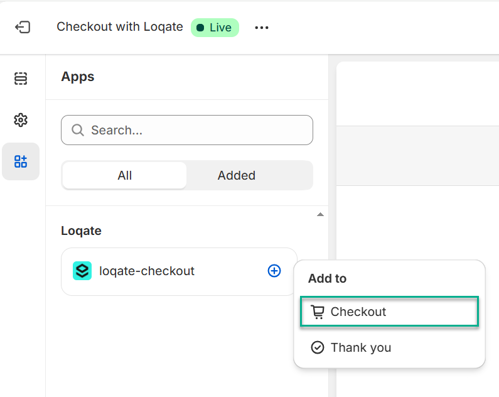
First, add the Loqate-Checkout app block to your store - but this time it needs to be added to the Checkout section.
- In the Admin section of your Shopify Plus account, go to
Settings > Checkout. From here you can either edit your existing checkout, or create a new draft of your checkout layout (see the Address Capture section above for more details) - Select the Apps icon (the bottom icon) in the left-hand menu of the checkout editor, then search for 'Loqate'
- Select the loqate-checkout app, then click the plus button and select Checkout from the drop-down list
Once that's done, you just need to select the Enable email validation option from the 'Email Validation' section on the Loqate app's Admin page:

Once that's selected, click the Save button and move on to the next section.
Recommended: include company name
By default, Shopify is set to not include a Company name address field. As such, if an address includes a company name (for example if a customer orders a delivery to their place of work) it won't be included in the address that's populated in Shopify.
We recommend setting Shopify to include Company name as an optional address field, so that it will be populated any time an address does include a company name. Here's how to change that setting:
- Go to the site Settings page for your Shopify store
- Select the Checkout option from the left-hand menu
- Scroll down to the Customer information section
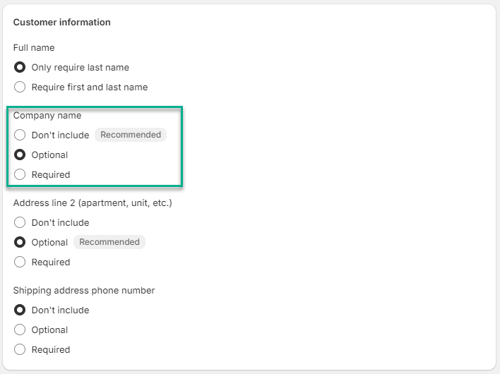
- Set Company name to Optional, then click the Save button
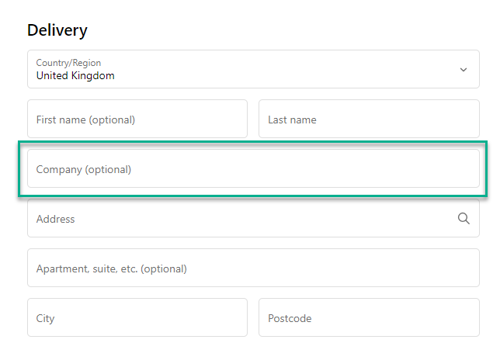
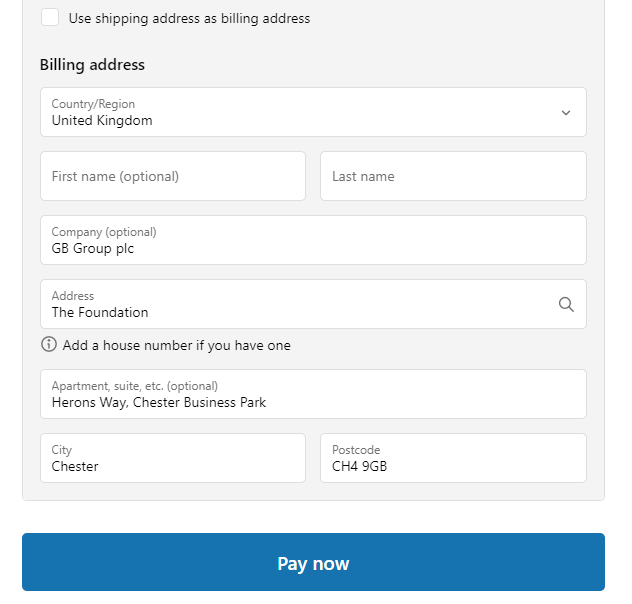
With that done, you should now see an optional Company address field in the checkout:
Optional: Use without Address Capture (not recommended)
We recommend always using Address Capture, as this helps reduce the chances of mistakes caused by manual address entry, ensuring addresses can be trusted as correct and giving the best customer experience. It is, however, possible to use just Address Verification or just Email Validation if you don't want any kind of address autocompletion functionality.
If you want to use Address Verification and/or Email Validation on their own, follow the full installation and setup process as above, then you can manually disable Address Capture. Here's how to do that:
- First, make sure that you've enabled at least one of Address Verification and/or Email Validation (see the 'Basic Setup' section earlier)
- Then, go to Settings > checkout and click the Customize option for your checkout
- Click on the Settings icon on the left-hand side, then scroll down to the Address autocompletion section

- Untick the Use address autocompletion option, then save the change to your Checkout configuration
This will have disabled the Address Capture functionality, while leaving Address Verify and/or Email Validation running.
Optional: Advanced Settings
The Advanced Settings page is located in the Admin section of your Loqate app, and includes the following optional settings.
Display a custom Loqate capture address search input on the checkout page
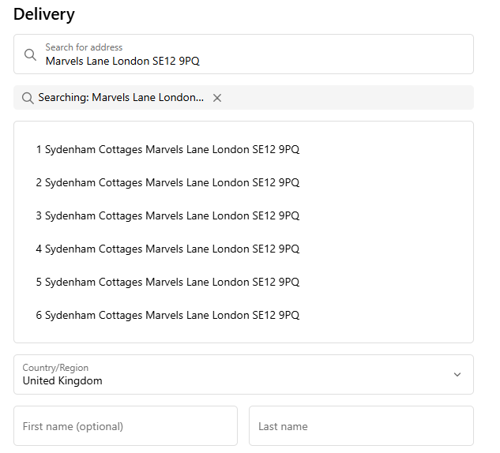
Selecting this option adds an additional 'Search for address' field onto the checkout page, which allows for containers to be used in searching for addresses. Entering a street, road or apartment building will where appropriate return a container displaying the number of addresses:
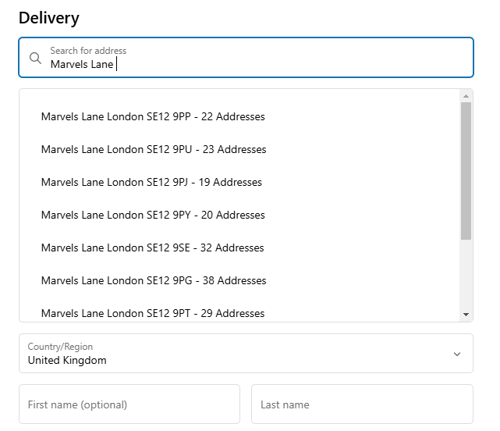
Select an option from the list to see a list of addresses within the container:
Note that with this enabled, Verify will not fire on the Thank You page when customers select addresses returned by Address Capture, unless they subsequently edit a returned address.
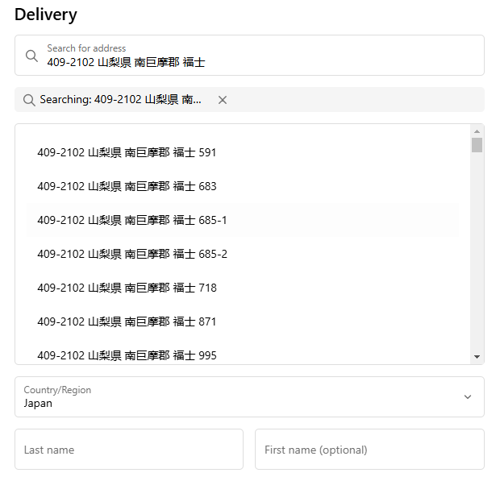
Force addresses to be returned in latin character sets where available
With this selected, Address Capture will always attempt to use any English results to set the delivery address, even with non-latin results. Note that for this setting to work, the 'Display a custom Loqate capture address search input on the checkout page' option must be enabled.
For example, here's a Japanese address searched for using Kanji characters:
And here's the result populated using the English version of the address:
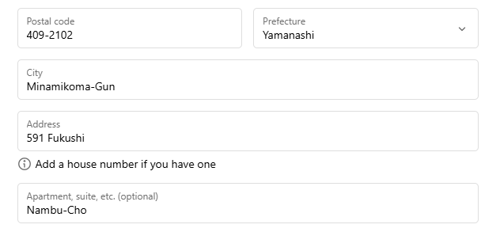
This is useful for when carriers have difficulty processing non-latin addresses.
Use address capture to allow customers to update their address if the shipping address cannot be verified
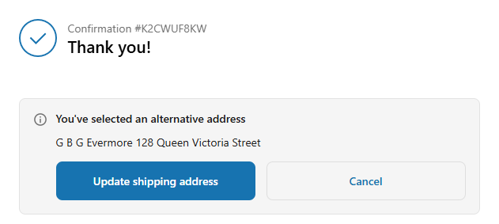
With this enabled, customers can manually amend their addresses post-checkout, if what they initially entered can't be verified. For example, if a customer hasn't entered their building number or apartment number they can go back and add it in.
Under these circumstances, after an order has been confirmed the customer will be presented with a list of possible addresses to choose from:

If the customer selects one of the suggested addresses, they will then see a notification acknowledging the address they've selected and giving them the option to update their shipping address:
Use enhanced country validation on unverified addresses
Sometimes it can be possible for a customer to enter an address with the wrong country, which as standard will be flagged as an unverified address.
Selecting this option enables Address Verify to be automatically called for a second time whenever an address is returned as unverified. For the second call, Address Verify will run using enhanced country verification, providing another opportunity to verify the address with the correct country.
For this to function Address Verify must be enabled on the Thank you page. This functionality may incur additional charges for enhanced verification.
In use
Once the Loqate Shopify app is installed and configured, your customers can start using Loqate's Address Capture service when inputting their addresses. Here's an overview of what this looks like in practice, using an example checkout page:
We've also put together some screenshots of how that might look on an example checkout page, to give you a sense of what to expect.
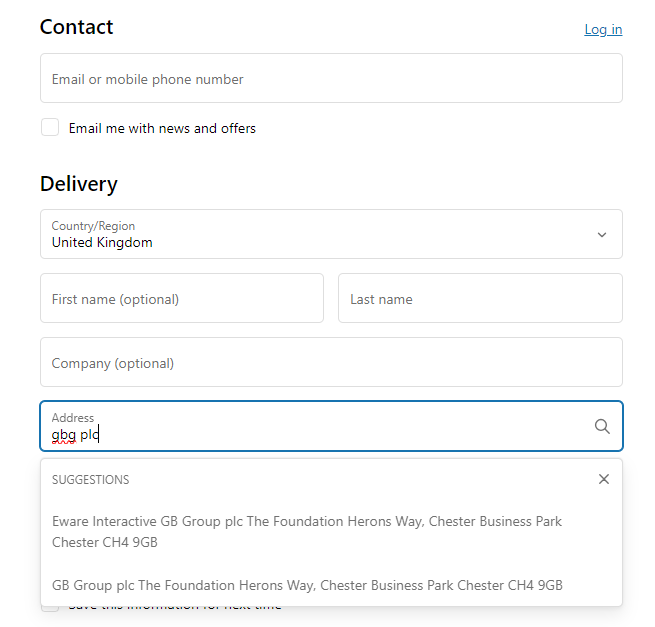
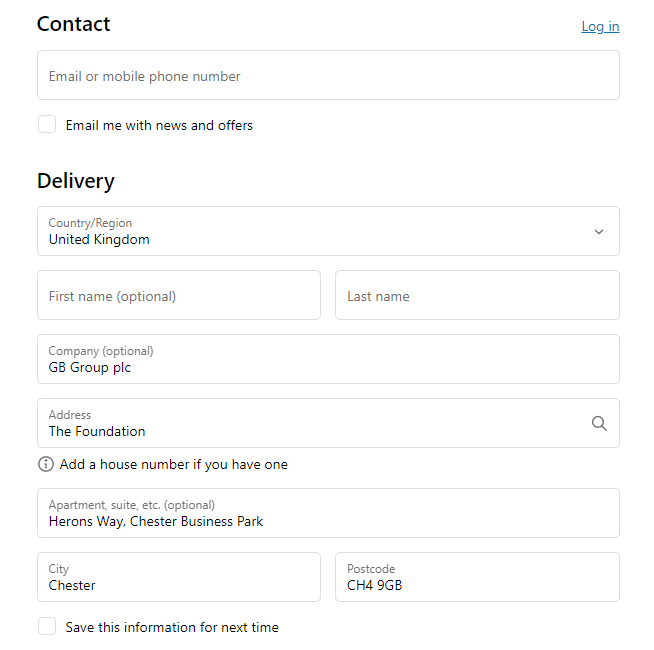
Address Capture
Here's what it looks like during an address lookup and after an address has been selected in the Delivery address section:
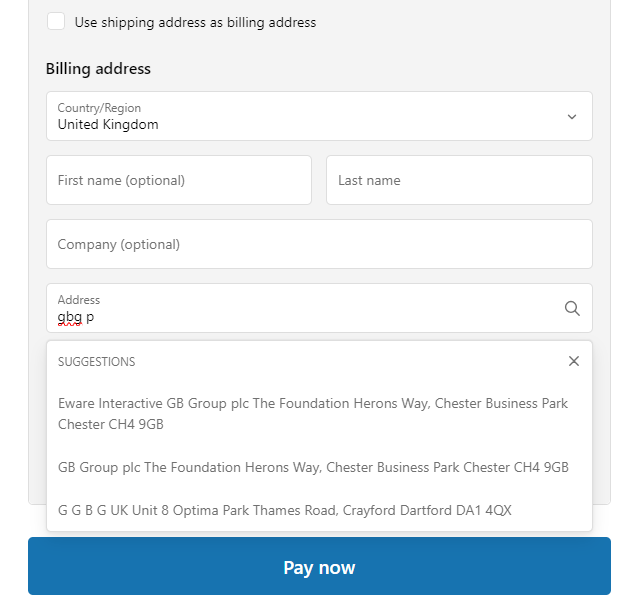
And here's what it looks like during an address lookup and after an address has been selected in the Billing address section:
Note: the countries listed in the Country/Region dropdown list are tied directly to what you've set in the 'Shipping and delivery' section of your Shopify store settings. Therefore, if you only ship to certain countries, only those countries will appear in the dropdown. If a customer enters an address outside of those countries, Address Capture will not be able to return suggestions in the country they're looking for and Address Verify will not recognise the inputted address (see the Address Verify section below).

Address Verify
If you have enabled Address Verify, this functionality will trigger on the Thank You page after a customer has confirmed an order.
Immediately after the Thank You page loads, a message will appear saying "Please wait while we verify your address...":
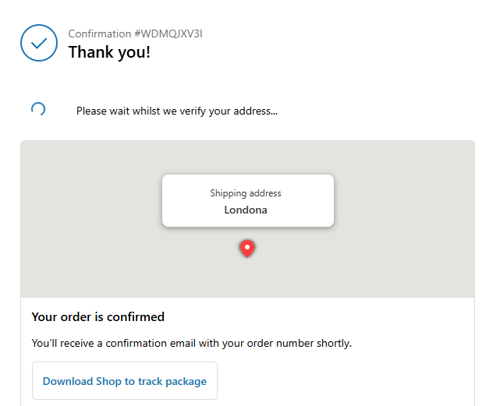
This message will adjust depending on the results that Address Verify can return, with three main possibilities:
- No changes required
- Alternative address found
- Address not validated
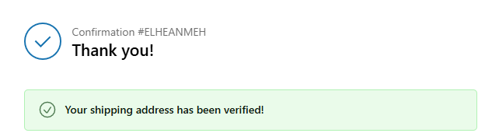
No changes required
If the customer's address is successfully verified with no changes required, the Address Verify message will change to "Your shipping address has been verified!":
Alternative address found
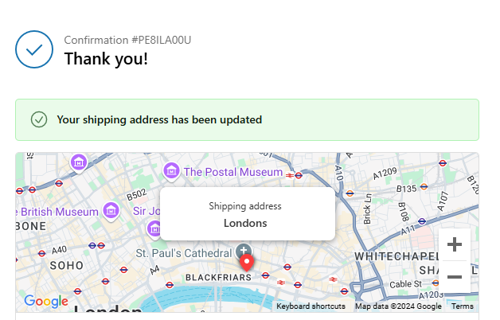
If, however, Address Verify finds an alternative address to suggest, the message will instead change to say "We've found an alternate address", and give the customer the option of either applying or declining the proposed changes:

If the customer clicks Apply changes, the message will change to say "Your shipping address has been updated":
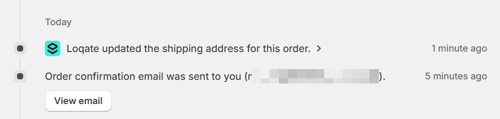
NOTE: customers will not see the updated address reflected on the Thank You page, however if you check the Orders section of your Shopify Plus account and find the transaction in question, you'll see that the shipping address has been updated.
For example, here you can see that the billing address remains as it was originally inputted, but the shipping address has been corrected by Address Verify:

You can also see evidence of the update in the order's timeline:
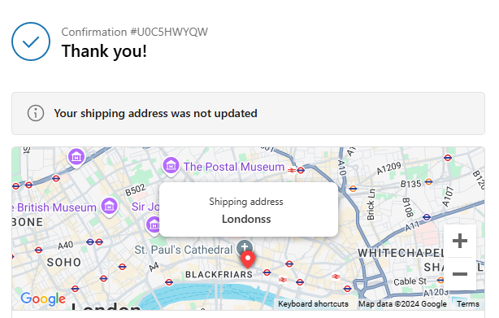
Not all customers will choose to use the alternative addresses offered by Address Verify, however. If a customer chooses to ignore the suggestion, they will instead see a message which says "Your shipping address was not updated":
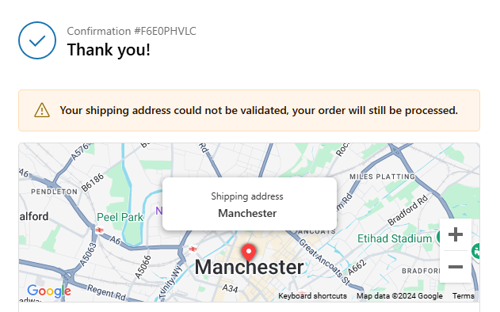
Address not validated
Lastly, if an address is sufficiently low quality that Address Verify can't validate it, the customer will instead see a message reading "Your shipping address could not be validated, your order will still be processed."
Email Validation
If you have enabled Email Validation, this functionality will trigger when a customer enters an invalid email address. Here's what that will look like:
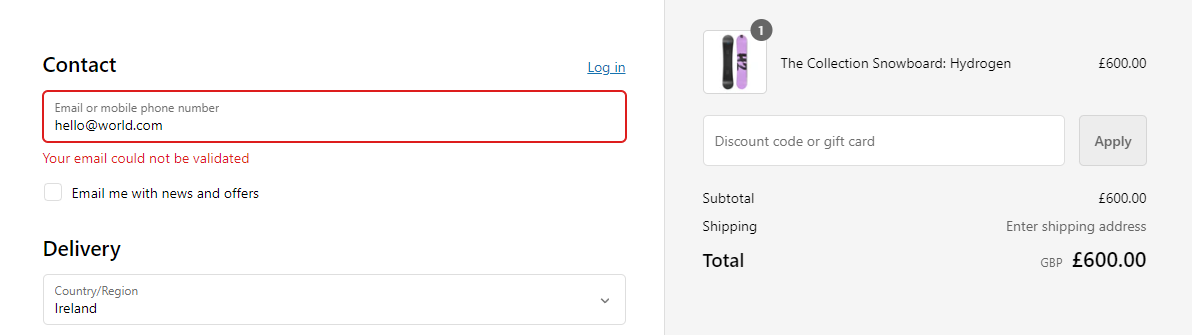
When a customer enters a valid email address, this notification will disappear and they will be able to proceed through the checkout.
Troubleshooting
I can't see some of the Admin options described in this guide
The Loqate Shopify Integration requires a Shopify Plus account. If you don't use Shopify Plus, you won't see all of the necessary options and won't be able to use this integration.
The Capture autocomplete field is not showing on my checkout
Ensure that the API key is correct on the Admin page.
When selecting an address, the fields do not populate
Ensure that your API key is correct on the Admin page, and that you have sufficient credit on your Loqate account.
How do I uninstall the Loqate app?
If you no longer want to use the Loqate Shopify Plus integration, you can uninstall it from your Shopify Plus store.
Please note: if you uninstall the Loqate app and then want to start using it again at a later date, you will need to go through the full installation process again.
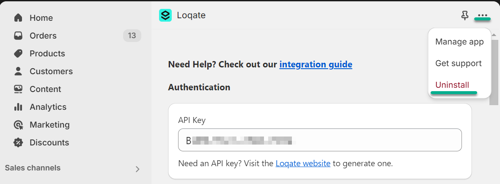
To uninstall the Loqate app, go to the Admin page of the app within your Shopify account and click on the three dots at the top-right of the screen. You will see an option to uninstall there:
When you click Uninstall, you'll be prompted to choose a reason for uninstalling:
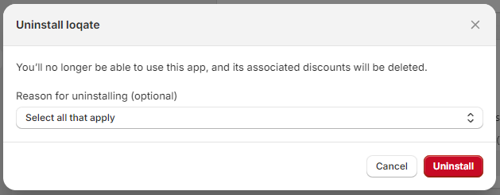
Select one or more reasons, then click the Uninstall button. This will uninstall the app and return you to the 'Installed Apps' section of your Admin page.
