How To Implement a Store Finder
This guide will walk you through the process of setting up a Store Finder in JavaScript, using the Loqate Store Finder APIs and MapLibre for map rendering.
By the end of this guide you will have a functional Store Finder that will allow you to:
- Capture an end user's location and convert this to co-ordinates
- Calculate the closest stores to that end user from your Location List
- Display those stores (and information associated with them) in a UI panel
- Display the end user location and stores on a map
Note that this guide is specific to setting up a Store Finder using JavaScript, which is the only supported integration currently.
As mentioned above this guide focuses on using MapLibre for rendering, however other open source libraries are available for this - such as Leaflet and Tanagram.

CSS Styling
Tailwind CSS styling is used throughout this guide to minimise the need for 'custom' styling, however you can use whatever CSS styling you like.
We've broken the setup process down into a number of steps which need following in order. Those steps are:
- Prerequisites
- Creating the HTML for your application
- Adding an interactive map
- Adding geocoding
- Displaying store information and markers
- Attribution statement
Prerequisites
Before getting started it is essential that you understand some of the key concepts of a Store Finder and have everything set up to start building.
You should:
- Read the How Does a Store Finder Work guide, which explains some of the core concepts behind our APIs
- Create a Store Finder service in your account, which will enable the appropriate keys to access our APIs
- Create a Location List via either the UI or our Create List API
Creating the HTML for your application
This step will cover setting the foundation of your Store Finder's HTML, and will determine where the components we add later are placed.
- Create index.html
- Insert the following HTML, which will create the foundation for your Store Finder with a div on the right for where you map will be rendered and a div on the left for where your stores will be listed. Note that this includes a script reference for TailWind CSS to make styling easier, but you don't need to do this if you're using your own CSS styling.
<!DOCTYPE html> <html lang="en"> <head> <meta charset="UTF-8"> <meta name="viewport" content="width=device-width, initial-scale=1.0"> <link href="https://cdn.jsdelivr.net/npm/tailwindcss@2.0.4/dist/tailwind.min.css" rel="stylesheet"> <script src="https://cdn.tailwindcss.com"></script> <title>Store Locator</title> </head> <body class="h-screen"> <div class="flex flex-row"> <div class="basis-1/5 p-8 overflow-auto"> Stores will go here </div> <div class="basis-4/5"> Map will go here </div> </div> </body> </html> - Save the file.
- View our additions so far.
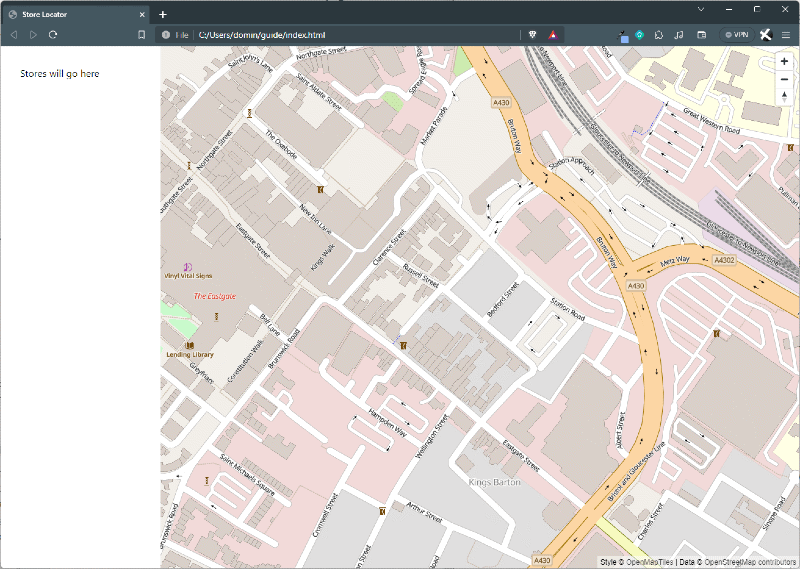
Adding an interactive map
This step covers adding in the interactive map to your page so that your end user can visualise the results of a search. We use MapLibre as a rendering library for this, but other map renderers are available.
- Open index.html
- Add the required dependencies and our Javascript entrypoint. Changes are marked within <!-- NEW --> and <!-- END --> tags.
<!DOCTYPE html> <html lang="en"> <head> <meta charset="UTF-8"> <meta name="viewport" content="width=device-width, initial-scale=1.0"> <link href="https://cdn.jsdelivr.net/npm/tailwindcss@2.0.4/dist/tailwind.min.css" rel="stylesheet"> <script src="https://cdn.tailwindcss.com"></script> <!-- NEW --> <link href="https://unpkg.com/maplibre-gl/dist/maplibre-gl.css" rel="stylesheet"> <!-- END --> <title>Store Locator</title> </head> <body class="h-screen"> <div class="flex flex-row"> <div class="basis-1/5 p-8 overflow-auto"> Stores will go here </div> <div class="basis-4/5"> <!-- NEW --> <div id="loqate-map" class="h-screen"></div> <!-- END --> </div> </div> <!-- NEW --> <script src="https://unpkg.com/maplibre-gl/dist/maplibre-gl.js"></script> <script src="index.js"></script> <!-- END --> </body> </html> - Save the file.
- Create index.js. In this section we cover a function to call our Map Tile API, which will return a signed URL that can be used to pull map tiles and style from Loqate. This URL is then passed into MapLibre along with a zoom level and co-ordinates of where to centre the map. If you're setting up a Store Finder for a specific country, you could use the centre point of that country so that the map always starts there. In our example we're setting the co-ordinates to Gloucester in the UK, and a zoom level of 16 (which is street level).
// Remember to replace with your api key const apiKey = "{KEY}"; // Remember to replace with your Location List Id once you upload the locations const locationListId = "{listId}"; /** * Asynchronously retrieve a signed URL from the Loqate API. * * @param {string} key - The API key used to authenticate the request with Loqate API. * * @returns {Promise} - A promise that resolves with the signed URL as a string. * * @throws {Error} - Throws an error if the HTTP request fails or other exceptions occur. */ async function fetchSignedUrl(key) { try { // Initiate an asynchronous fetch request to the Loqate API to retrieve a signed URL. // Construct the URL by embedding the provided API key as a query parameter. const response = await fetch(`https://api.addressy.com/LocationServices/Mapping/GetUrl/v1.00/json4.ws?key=${key}`); // Validate if the response status is OK (HTTP status 200-299). // If not, an error is thrown with the HTTP status to indicate the request was unsuccessful. if (!response.ok) { throw new Error(`HTTP error! Status: ${response.status}`); } // Parse and extract the relevant data from the API response. // The response is expected to be a JSON object. const data = await response.json(); // Retrieve and return the 'VectorStyleUrl' property from the parsed JSON data. // This URL is a signed URL valid for one hour. Check the API documentation for more info. return data.VectorStyleUrl; } catch (error) { // If an error occurs during the fetch request or data parsing, it's logged to the console for debugging purposes. console.error('Fetch error: ', error.message); // Rethrow the error to ensure calling functions are aware that an error occurred, // and can handle it appropriately (e.g., show a user-facing error message). throw error; } } /** * Asynchronously initialize an interactive map using MapLibre GL and a signed URL from the Loqate Map Tile API. * * @param {string} key - The API key used to retrieve the signed URL from the Loqate Map Tile API. * * @returns {Promise} - A promise resolving with no value. It completes when the map is initialized. * * @throws {Error} - Throws an error if there's a failure in fetching the signed URL or initializing the map. */ async function initMap(key) { try { // Retrieve the signed URL by invoking the fetchSignedUrl function // and passing the API key as an argument. // The signed URL is required to initialize the map with a specific style. let signedUrl = await fetchSignedUrl(key); // Create and initialize a new MapLibre GL map object. // - 'container': ID of the HTML element where the map will be injected. // - 'zoom': Initial zoom level for displaying the map. // - 'center': The initial geographical point where the map will be centered. Here, it's centered on Gloucester, UK. // - 'style': A signed URL to fetch the map style, which is retrieved from the Loqate API. let map = new maplibregl.Map({ container: 'loqate-map', zoom: 16, center: [-2.2408, 51.8639], style: signedUrl }); // Add a navigation control to the map. // This allows users to zoom and pan around the map interactively. map.addControl(new maplibregl.NavigationControl()); return map; } catch (error) { // If an error occurs during the map initialization, log it to the console for debugging purposes. console.error('Map initialization error: ', error.message); // Optionally: Rethrow the error after logging it, or handle it in a way that’s appropriate for your user experience. // throw error; } } async function main() { const map = initMap(apiKey); } main(); - Save the file.
- View our additions so far.
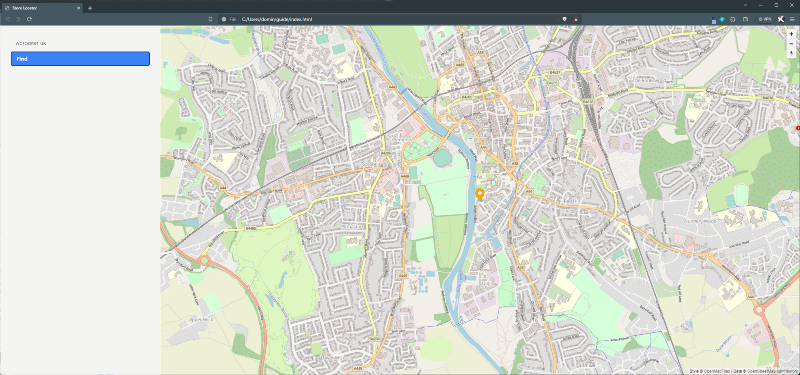
Adding geocoding
The next step is to add a way of capturing your end user's address/postcode/city/locality and converting it into co-ordinates. Co-ordinates are required for us to do our distance calculation later in the guide.
The following code will add a simple input field, a Find button to start the geocode process, and a marker to the map of where the end user is.
- Open index.html
- Add the following addition to index.html, which adds the text input field and Find button. Changes are marked within <!-- NEW --> and <!-- END --> tags.
<!DOCTYPE html> <html lang="en"> <head> <meta charset="UTF-8"> <meta name="viewport" content="width=device-width, initial-scale=1.0"> <link href="https://cdn.jsdelivr.net/npm/tailwindcss@2.0.4/dist/tailwind.min.css" rel="stylesheet"> <script src="https://cdn.tailwindcss.com"></script> <link href="https://unpkg.com/maplibre-gl/dist/maplibre-gl.css" rel="stylesheet"> <title>Store Locator</title> </head> <body class="h-screen"> <div class="flex flex-row"> <div class="basis-1/5 p-8 overflow-auto"> <!-- NEW --> <div class="flex flex-row"> <input class="shadow appearance-none border rounded w-full py-2 px-3 text-gray-700 leading-tight focus:outline-none focus:shadow-outline" id="input" type="text" placeholder="Address"> </div> <div class="flex flex-row"> <button id="find" class="bg-blue-500 hover:bg-blue-700 text-white font-bold py-2 px-4 rounded flex flex-grow items-center mt-2 text-center"> Find </button> <!-- END --> </div> </div> <div class="basis-4/5"> <div id="loqate-map" class="h-screen"></div> </div> </div> <script src="https://unpkg.com/maplibre-gl/dist/maplibre-gl.js"></script> <script src="index.js"></script> </body> </html> - Save the file.
- Open index.js and add the following additions. The first code block wraps the call to our Geocoding API, while the second block is a helper function for adding markers to our map.
/**
 * Asynchronously retrieve geocoding data for a given text input using Loqate API.
 *
 * @param {string} input - The text to be geocoded (e.g., an address or place name).
 * @param {string} key - The API key used to authenticate the request with the Loqate API.
 *
 * @returns {Promise<object>} - A promise that resolves with the parsed JSON response from the API.
 *
 * @throws {Error} - Throws an error if the HTTP request fails.
 */
async function geocodeText(input, key) {
  // Perform an asynchronous HTTP request to the Loqate Geocoding API.
  let response = await fetch(`https://api.addressy.com/LocationServices/Geocoding/Global/v1.00/json4.ws?input=${input}&Key=${key}`);

  // Check if the request was successful (HTTP status 200-299).
  if (!response.ok) {
    // If not successful, throw an error with the HTTP status.
    throw new Error(`HTTP error! Status: ${response.status}`);
  }

  // If the request was successful, parse the response data as JSON.
  const data = await response.json();

  // Return the parsed data to the caller.
  return data;
}
/** * Add a marker to a map using MapLibre GL. * * @param {object} map - A map object from MapLibre GL. * @param {number} lat - The latitude where the marker should be placed. * @param {number} lng - The longitude where the marker should be placed. * @param {string} [color=undefined] - (Optional) The color of the marker. If unspecified, the default marker color will be used. * * @returns {object} marker - The created marker object, allowing further manipulation outside of this function if needed. */ function addMarker(map, lat, lng, color = undefined) { // Initialize an options object that will be used to configure the marker. let options = {}; // If a color is specified, add it to the options object. if (color) { options.color = color; } // Create a new marker using the options object, set its longitude and latitude, and add it to the map. const marker = new maplibregl.Marker(options) .setLngLat([lng, lat]) .addTo(map); // Return the marker object for potential additional use or manipulation outside of this function. return marker; } - Add the following to the main function. This adds an event handler to the Find button that will call our Geocoding API and then use the co-ordinates returned to add a marker to the map and move to that location.
async function main() { const map = await initMap(apiKey); /** * Asynchronously handle a click event to geocode a text input and update the map view. * * Note: Assumes the availability of `geocodeText`, `addMarker`, and `apiKey` in the same scope. * * @returns {Promise} - A promise resolving with no value. It completes when the map has been updated. * * @throws {Error} - Throws an error if geocoding fails or the location is not found in the geocoding response. */ const onFindClick = async () => { try { // Retrieve the input element with the ID 'input'. let inputElement = document.getElementById('input'); // Extract the text value from the input element. let value = inputElement.value; // Asynchronously request geocoding data for the input text using the geocodeText function. // Note: apiKey is assumed to be declared in a higher scope. let res = await geocodeText(value, apiKey); // Validate the response to ensure it contains the expected geocoding results. if (!res.Items || !res.Items[0].Results || !res.Items[0].Results[0].Latitude || !res.Items[0].Results[0].Longitude) { throw new Error("Geocoding response does not contain valid location data."); } // Extract the latitude and longitude from the first result in the geocoding response. let lat = res.Items[0].Results[0].Latitude; let lng = res.Items[0].Results[0].Longitude; // Adjust the map view to center on the geocoded location and update the zoom level. // Note: map is assumed to be declared in a higher scope. map.jumpTo({ center: [lng, lat], zoom: 14 }); // Add a marker to the map at the geocoded location with the specified color. addMarker(map, lat, lng, '#FFA500'); } catch (error) { // If an error occurs during the process, log it to the console for debugging purposes. console.error('Error during find click action: ', error.message); // Optionally: Display a user-friendly error message or handle the error in another appropriate way for your application. } } document.getElementById('find').addEventListener('click', onFindClick); } - View what we have so far. You can type an address into the text box and click Find - the map should then update with the location you entered pinned on the map.
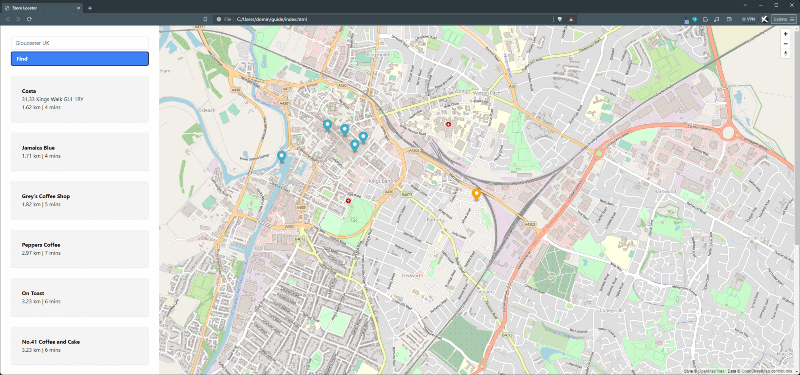
Displaying store information and markers
This next step is to retrieve the closest stores to the end user and display these in the left pane, along with markers on the map. This requires the use of a previously uploaded Location List either via our Create List API or the List Upload UI in your Account section.
- Open index.html and add a Store container following our Find button div.
<div class="flex flex-row"> <div id="stores"></div> </div> - Then add the following as the last element within the body section. This determines which pieces of store information will be displayed on the page.
<template id="store-template"> <div class="mt-8 p-8 shadow bg-gray-100"> <h1><b id="title">Store Title</b></h1> <p id="address">address</p> <p id="distance">distance</p> </div> </template> - Open index.js and add the following, which sets the parameters for the call to our Distance Finder API, taking an origin location (where your end user is), the listID of your stores and other parameters such as the max distance.
/** * Asynchronously fetch and return the nearest locations to a specified geographical point using the Loqate API. * * @param {string} input - User's address or location name for descriptive purposes in the request. * @param {number} lat - Latitude of the origin location. * @param {number} lng - Longitude of the origin location. * @param {number} distance - Maximum distance (in kilometres) from the origin location to find nearby locations. A lower distance will improve performance. * @param {string} listId - Identifier of the list to search within for nearby locations. * @param {number} [maxResults=10] - Maximum number of nearby locations to return. A lower number will improve performance. * @param {string} key - The API key for authenticating requests with the Loqate API. * * @returns {Promise<object>} - A promise that resolves with the parsed JSON response from the API. * * @throws {Error} - Throws an error if the HTTP request fails. */ async function getNearestLocations(input, lat, lng, distance, listId, maxResults = 10, key) { // Construct a data object to be sent in the HTTP request body. // This includes authentication key, list identifier, distance and origin location details. let data = { 'key': key, 'locationListId': listId, 'maxDistance': distance * 1000, // Convert distance to meters. 'maxResults': maxResults, 'originLocation': { 'id': 'User input', 'name': 'Your address', 'description': '', 'address': input, 'latitude': lat, 'longitude': lng } }; // Perform an asynchronous HTTP POST request to the Loqate API. // The data object is stringified and sent in the request body. let response = await fetch(`https://api.addressy.com/LocationServices/DistanceFinder/Nearby/v1.00/json4.ws`, { method: "POST", headers: { "Content-Type": "application/json", }, body: JSON.stringify(data), }); // Validate the response status to ensure the request was successful (HTTP status 200-299). // If unsuccessful, throw an error with the HTTP status. if (!response.ok) { throw new Error(`HTTP error! Status: ${response.status}`); } // Parse and extract the data from the API response. let res = await response.json(); // Return the parsed JSON data to the calling function. return res; } - Add the following to index.js to add your store information to the left pane, and add a marker representing the store to the map.
/** * Add store information to the UI and place a marker on the map. * * @param {object} map - Map instance to which the marker will be added. * @param {array} markers - Array where the created marker will be stored for future reference. * @param {object} store - Store object containing the information to be displayed and marker coordinates. */ function addStore(map, markers, store) { // Retrieve the container to display store information and the template for store details. let stores = document.getElementById("stores"); let storeTemplate = document.getElementById('store-template'); // Clone the template content to create a new DOM subtree. let clone = document.importNode(storeTemplate.content, true); // Extract relevant store information. let name = store.DestinationLocation.Name; let address = store.DestinationLocation.Address; let distanceAndTime = store.Distance + " | " + store.Time; // Inject the extracted store information into the cloned template. clone.getElementById("title").innerHTML = name; clone.getElementById("address").innerHTML = address; clone.getElementById("distance").innerHTML = distanceAndTime; // Append the cloned template with injected information to the display container. stores.append(clone); // Extract latitude and longitude from the store information. let lat = store.DestinationLocation.Latitude; let lng = store.DestinationLocation.Longitude; // Add a marker to the map at the extracted coordinates. let marker = addMarker(map, lat, lng); // Store the created marker in the provided markers array for future reference. markers.push(marker); } /** * Remove displayed store information and markers from the map. * * @param {array} markers - Array of marker instances to be removed from the map. */ function clearStores(markers) { // Retrieve the container displaying store information. let stores = document.getElementById("stores"); // Clear all displayed store information from the container. stores.innerHTML = ""; // Iterate through the provided markers array and remove each marker from the map. markers.forEach(marker => { marker.remove(); }); // Reset the markers array. markers.length = 0; } - Update main to the following. This will make the call to our Distance Finder API and iterate through the results to display them in the UI and on the map. Remember to Update the locationListId variable with the desired Id of the uploaded list.
async function main() { const map = await initMap(apiKey); let markers = []; const onFindClick = async () => { clearStores(markers); let inputElement = document.getElementById('input'); // Getting the value property of the input element which holds the text let value = inputElement.value; let res = await geocodeText(value, apiKey); let lat = res.Items[0].Results[0].Latitude; let lng = res.Items[0].Results[0].Longitude; map.jumpTo({ center: [lng, lat], zoom: 14 }); let marker = addMarker(map, lat, lng, '#FFA500'); markers.push(marker); let points = await getNearestLocations(value, lat, lng, 50, locationListId, 10, apiKey) points.DestinationLocations.forEach(element => { addStore(map, markers, element); }); } document.getElementById('find').addEventListener('click', onFindClick); } - You can now test by entering an address in the text box and clicking Find. This will update the map with locations close to the address entered.
Attribution Statement
You must ensure attribution is visible when rendering a map as part of your application. Loqate uses map styling from OpenMapTiles and open data from OpenStreetMaps.
Attribution is provided by default as part of the map style configuration, however if you choose to create your own map styling you must still ensure that this attribution is visible. For further information on copyright notices please see the Loqate Terms and Conditions.
