HubSpot Integration Guide
If you use HubSpot forms on your website and would like to add address validation then this guide is for you.
Before you start, make sure you have a Loqate account. If you don’t already have one, you will need to sign up. We offer a two-week trial with daily free credits so you can test and make sure you are happy it all works.
Low-Code Integration
Integrating Loqate is simple and quick. This guide shows you step by step what to do and the best thing is, you do not need any technical knowledge.
Familiar with code?
For a more advanced, customized installation, use our Advanced Setup Guide or Address Capture API. We also provide a Sandbox.
Adding the Loqate tag to your site
To get started, log in to your Loqate account, select “Add service” from the top of the page then click the “Start setup” button under Address, Email and Phone Verification.


Select "Website" and enter the URL of the site you're putting the service into, for example, https://www.loqate.com. If you've got access to a staging site to test with first, use the staging site's URL, for example, https://loqate.test.com.
Click "Next" to continue. You will be presented with a snippet of code (tag) to add to your website.
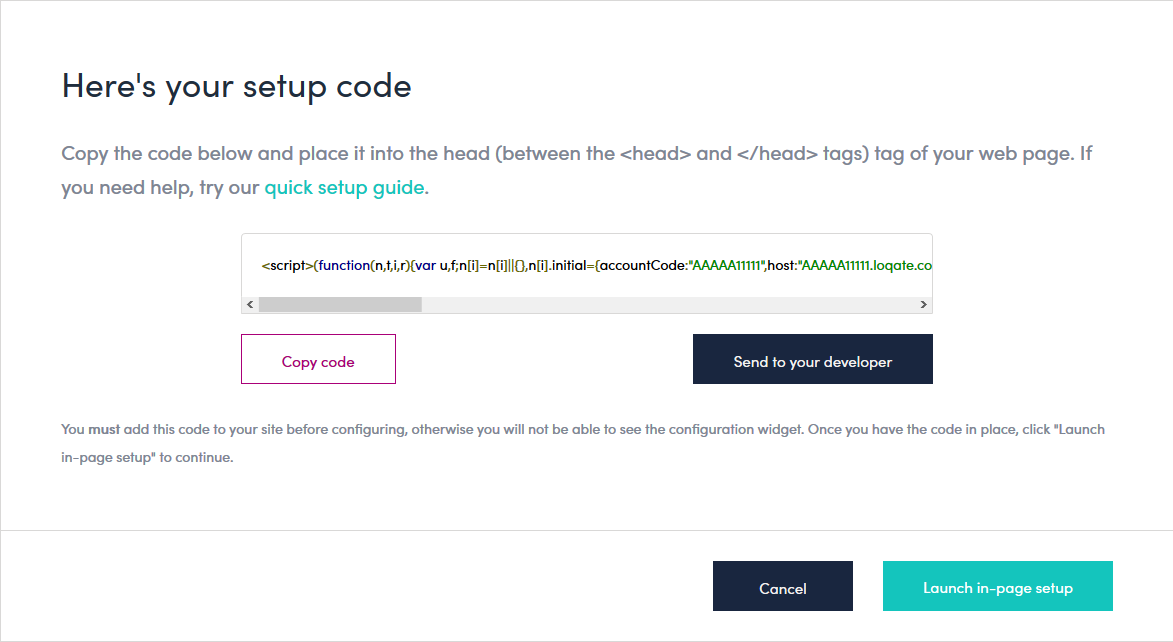
Copy the code generated for you and paste it into the <head> section in the HTML of your website.
Tip: placing this tag on each page of your site makes the setup process easier and is easy to do if you have a layout template for your site.
For the best experience, we recommend also adding the below code to turn off browser autofill for address form fields. Browser autofill is a feature in search engines like Google Chrome, Opera and Safari that automatically populates form fields with previously-entered information, such as passwords, addresses, and credit card data. Browser autofill hides our address validation solution which means users could still provide you with inaccurate address data.
At the end of the Loqate tag, after (window,document,"pca","//YOURACCOUNTCODE.pcapredict.com/js/sensor.js") and before </script> insert the following code:
pca.on("load", function(type, id, control){
var isChrome = !!window.chrome || !!window.chrome.webstore;
if (isChrome == true){
  for (i=0; control.fields.length > i; i++){
    pca.getElement(control.fields[i].element).autocomplete = "PCATEST";
  };
};
});
To make sure the selected address is submitted to HubSpot, you will need to add one more piece of code. Add the below code after the browser autofill code and before </script>:
pca.on("data", function(source, key, address, variations) {
if (source === "address") {
  for (var i = 0; i < pca.platform.productList[key].PLATFORM_CAPTUREPLUS.bindings[0].fields.length; i++) {
    var pcaField = document.getElementById(pca.platform.productList[key].PLATFORM_CAPTUREPLUS.bindings[0].fields[i].element);
    if (pcaField) {
      pca.fire(pcaField, "change");
    };
  };
};
});
Once you have finished adding the code to your website, save and make sure it's live. Then click the "Launch in-page setup" button on the setup screen.
The setup process will now open your site using the URL provided earlier. Browse to the page containing the form on which you would like to install address verification. Any address, email and phone fields will automatically be detected and mapped to our data.
Mapping your fields
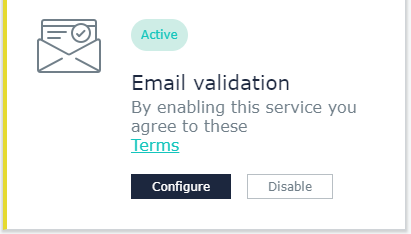
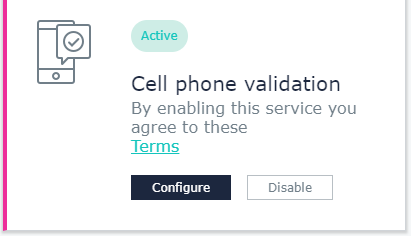
Make sure you have read our terms and click "Configure". If you would only like to add address validation, make sure to 'Disable' the email and phone fields and vise versa.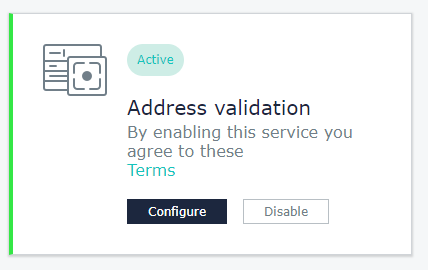
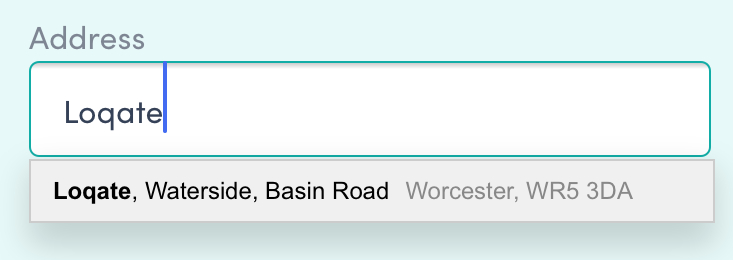
Try finding an address on your form. Start typing any part of the address within your form field. A list of valid addresses should display underneath, like the example below. The more you type, the more accurate the results will become. Once you find the address you want, simply click it and the rest of your address fields should autofill.
If everything works as you expect it to, press the "save" button at the bottom of the setup window on the right-hand side. If your fields aren’t mapping properly, or you want to customise any field settings, read the Field types section of this guide.
Congratulations, your address validation setup is now complete.
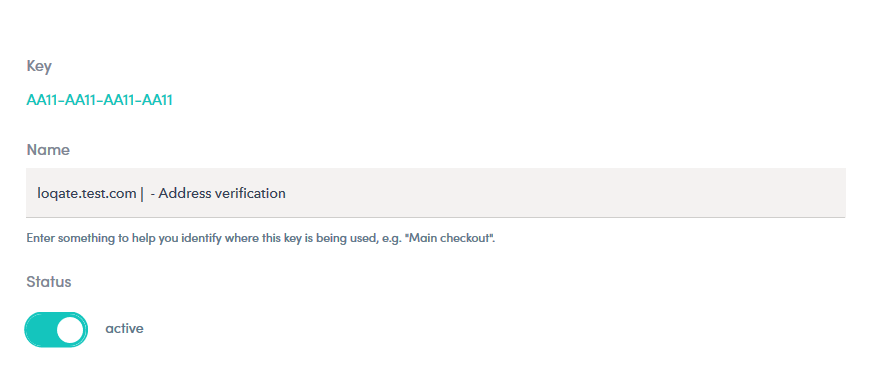
Make sure you give this installation a memorable name. It will help you identify where this is being used in the future, e.g. "Main checkout" or "Delivery address".
Next, we recommend you check out the available settings to help you control usage.
Would you like to install another service or add address validation to another form or site?
If you tested on a staging site first and are happy to go live, we recommend you go through the setup process again for your live site to keep the two separate.
Remember: if at any point you get stuck or have questions regarding our products or setup process, please contact our support team or chat with us live from the setup screen.
Setting options
There are several settings that help you control usage. We've broken them down into three main categories: Configuration, Security, and Control. Let's find out which settings are best for you.
NOTE: If you make any changes, you will need to click the “Save” button for those changes to take effect.
Configuration
Under "Configuration" you can adjust two basic settings:
- Name - This allows you to customise the name of the selected service. If you use more than one service (API Key) in your account, this is particularly useful to help you identify which one is which.
- Status - With this toggle, you can turn the service on (active) or off (inactive).
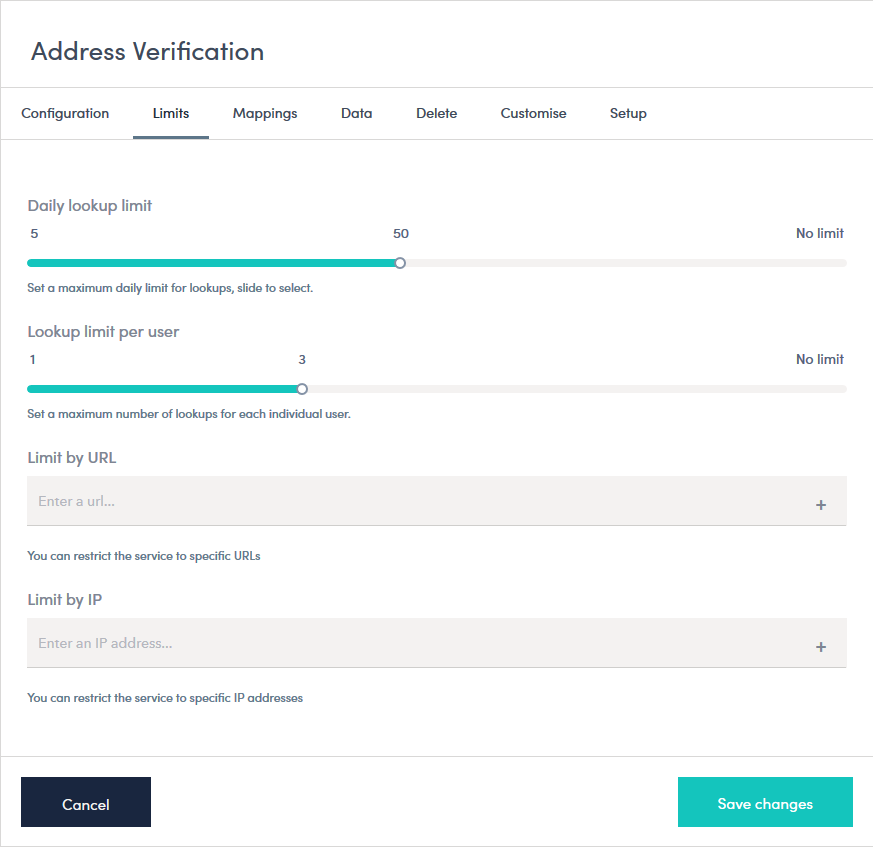
Limits
To control spend or place limits on the number of requests made by individual IP addresses, we strongly recommend that you complete these settings.
- Daily lookup limit - The maximum spend level allowed on this installation per day. Set this to a sensible amount that you do not want to exceed but that won't affect expected daily usage.
- Lookup limit per user - To stop users from selecting multiple addresses, you can set a limit per user per day. To allow certain users, such as staff members, to perform as many lookups as needed per day, you can add specific IP addresses in the Limiter Exclusions. IP addresses in this list won't be affected by the "Lookup limit per user" rule. Just add the IP address and click +
- Limit by URL - To help prevent fraudulent or accidental use across domains, simply add the URLs that you expect the address lookups to be coming from. A "catch-all" URL is recommended e.g. https://www.mysite.com as this will include pathnames following the URL, whereas https://www.mysite.com/checkout will be limited to just that page. You will also need to specify any subdomains and other country domains that might be used. i.e. http://www.mysite.co.uk, http://www.mysite.com, http://mysite.co.uk, etc.
- Limit by IP - This allows only the entered IP addresses access to this service. For example, only employees working in a certain office should be able to use this service. Enter the office's IP address and click +. You can add as many IP addresses as you like.
Additional Data
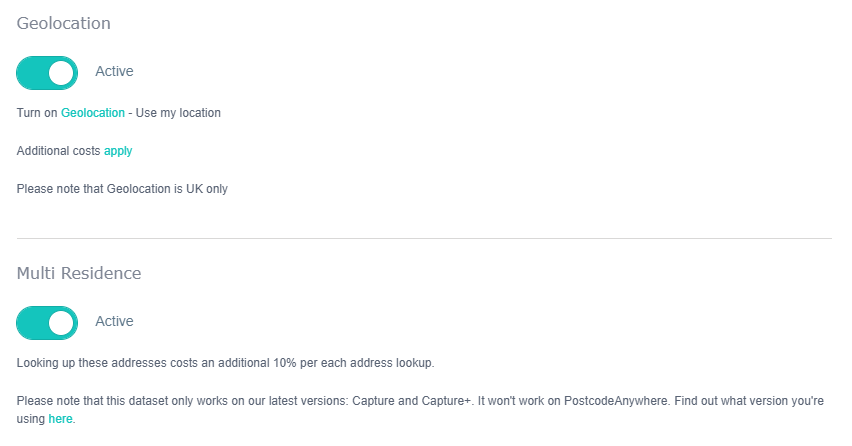
To add the additional UK dataset Multi Residence to your service, simply switch the toggle to Active. Please note that this only activates this dataset on this specific service/key. If you use multiple keys and would like to apply the Multi Residence dataset to all keys within your account, select "Your Account" in the menu and scroll down to "Data settings".
You can also activate Geolocation, to offer your mobile customers an even better experience when entering their address.
- Geolocation - Next generation geolocation technology that allows your mobile customers to find their location in a single tap.
- Multi Residence - The Multiple Residence dataset from Royal Mail contains over 700,000 additional address records not recorded in PAF® of any premise where multiple households share a letterbox, such as apartment blocks.
If you are interested in any of our other additional datasets, such as Eircodes, please get in touch.
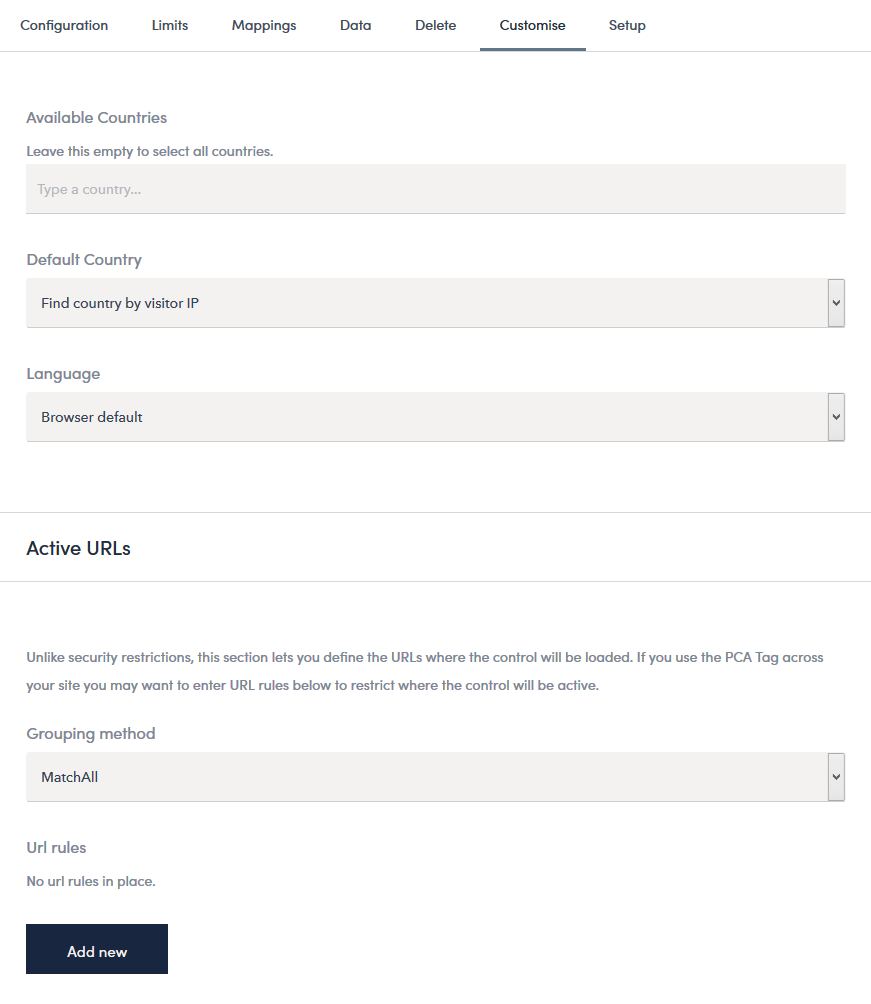
Customise
Control country settings and default languages to customise the service to your audience.
- Available countries - If you only do business in one or a specific set of countries, you can limit lookups to selected countries. Address autocomplete will only be available for the countries on this allowed list. Click on the name of the country to add it. You can remove it again by clicking the x next to the country name. Note: The order in which the countries appear within this list, will be the same order they will appear on the form.
- Default country - By default the user's IP address is used to provide the most relevant addresses first. You can override this and force any country of your choice by selecting one from the dropdown list. This may be useful if you expect the majority of your customers come from one country.
- Language - Addresses can be returned in a variety of languages that use Roman characters. Whilst the default setting is to match the user’s browser settings, you can specify an overriding language by selecting one from the dropdown list. Currently, address verification can support the following languages: Dutch, English (UK), English (Canada), English (US), French, German, Hungarian, Italian, and Spanish.
- Active URLs - Active URLs will limit the on-screen setup controls for the product to a specific URL.
Field types
You are in control of which HubSpot properties the service submits the address data to. To use custom properties please follow the below settings. If there is anything specific you are looking for, give our support team a call and they will try to help you figure out a solution.
Accessing field settings
Our code automatically detects address fields on the form. A standard HubSpot property such as 'Address Line 1' will map to our field 'Line 1'. To select custom properties or if the mapping doesn't work, click on the "configure" button.

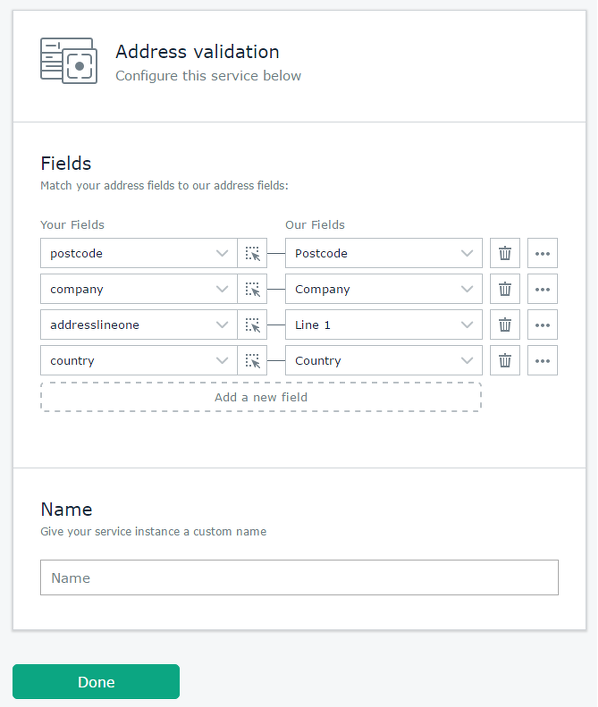
Manually map fields
- To match a new field to a field type, click “Add a new field”. Now you can either manually choose your own field by name/id from the dropdown list under the “Your Fields” column, or you can click the selection button
 and then click the field on your form that you would like to use.
 - Once you've selected the form field you want to put address validation on, you will need to pick a field type from the adjacent dropdown list under the “Our Fields” column. Field types correspond to a specific address component (i.e. Line1, Line2, City, etc). You can find out specific details regarding each of the types available in the Field types available section of this guide.
- If you need to remove any fields, click the bin icon on the right-hand side:
 next to the unwanted field.
 - To the right of each fieldset is a button to access additional settings for that field:
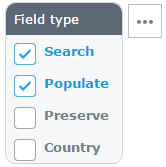
 . There are 4 settings to choose from and you can mix and match them as you please. These settings are:
- Search - Turns the field into a search bar, showing the returned address results when a user starts typing their address into the field.
- Populate - Populates the field with the relevant data after an address is selected.
- Preserve - Once populated, the field is not changed by the address validation again. This can be useful if you need to manually make a change and make it persist on the form.
- Country - Turns the field into a country dropdown list.
- When you are happy with your setup, click “Done” and then try searching for an address. If you are happy with the results, click the “Save” button at the bottom of the setup menu to save all changes.
At this point, the address validation will be live and running on your website with all of the settings you have chosen. For added security, we advise you to look at the service settings on your account. You can find out the benefits of doing so in the Settings section of this guide.
It is recommended to test across multiple popular web browsers after you've gone live.
Available field types
Below is a table of the most commonly used address fields available for address validation:
| Field name | Description |
|---|---|
| Line1-5 | The specific line number of the returned address |
| Town | The Town of the returned address |
| County | The County of the returned address |
| Postcode | The Postcode of the returned address |
| Country | The ISO 3166 Country name for the returned address |
| Company | Returns the full company name where registered |
| Search Input | Search bar where all the address validation magic happens |
| Building Name | Name of the building for the returned address |
| Building Number | Number of the building for the returned address |
| Sub Building | The Flat or Unit number within the building. i.e. Flat 1 |
| Street | The Street Name of the returned address |
| District | The locality within the Town or City |
| County Name | The name of the County, Province or State, i.e. California |
| County Code | The code of the County, Province or State, i.e. CA |
| 2-Character ISO Code | The ISO 3166 2-character Country Code for the returned address, i.e. GB |
| 3-Character ISO Code | The ISO 3166 3-character Country Code for the returned address, i.e. GBR |
| Formatted Address | The FULL address in the correct standardised format |
If you are looking for additional fields and formats, please contact support.
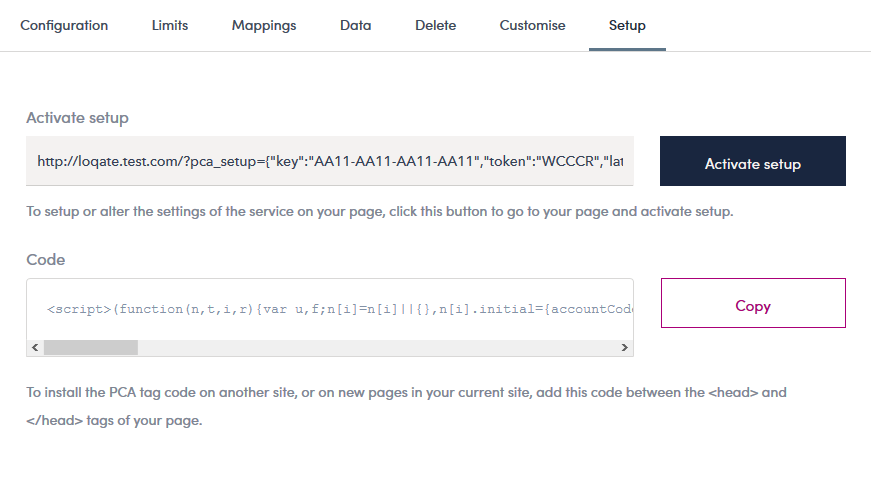
Reactivating setup
If at any point you need to change the way a service is set up on a form, you can reactivate the setup process with the following steps.
- Log into your account, then click on the relevant address validation installation.
- You should now be presented with the setup options for your address validation installation. Select the "Setup" tab.
- Click on "Activate" to start the setup process again. You will be taken back through the setup process for mapping your address fields.
Advanced customisation
Custom options
If you want to customise the look and feel of address validation, you can set advanced options by including this JavaScript snippet in your page.
<script type="text/javascript">
pca.on("options", function (type, id, options) {
  if (type == "capture+") {
    options.suppressAutocomplete = false;
  }
});
<script>
Custom events
If you call any custom methods or listen to events, you will need to include this snippet in your page to get a reference to the control objects as they load.
<script type="text/javascript">
pca.on("load", function(type, id, control) {
  control.listen("populate", function(address) {
    alert("User selected: " + address.Id);
  });
});
<script>
Loading problems
If address validation is not loading at the correct time, you can include this snippet in your page (directly below your address fields).
<script type="text/javascript">
pca.load();
<script>
Broswer autofill
On the Address Form Fields, we have found success in adding the attribute autocomplete="none", to disable the browser's autofill. For example:
<input id="Line1" type="text" autocomplete="none" placeholder="Start typing your address" autofocus name=“searchTerm” />Further information
For further information or help with any questions you may have about address validation, contact our dedicated support team who will be more than happy to help.